Securing MCP Servers: A Comprehensive Guide to Authentication and Authorization

MCP (Model Context Protocol) is emerging as a standard interface for connecting LLM agents to developer tools and APIs. From GitHub workflows to CLI utilities, early adopters like Claude Code and Cursor are using MCP to let agents trigger real-world actions. But as the adoption grows, comes a critical question: How secure are these integrations?
Recent security research has uncovered vulnerabilities in MCP deployments. A notable example includes a vulnerability in the official GitHub MCP server discovered by Invariantlabs, which allowed attackers to access private repository data. Such incidents highlight a concerning reality: the same flexibility that makes MCP powerful also introduces significant security risks when identity, access, and behavior aren’t properly controlled.
In this blog post, we will address the critical need for enhanced security measures in MCP deployments. Building on our previous exploration of production-ready MCP servers with their simple execution flow of Request -> Tool Handler -> GitHub API -> Response, we’ll now implement OAuth 2.0 and RBAC, evolving into a multi-tool server architecture with comprehensive security layers.
Understanding the MCP security landscape
The MCP protocol is designed to be flexible; servers can expose tools, and clients (often LLMs) can invoke them based on descriptions. But this flexibility introduces risks of identity, access, and behavior that are not controlled.
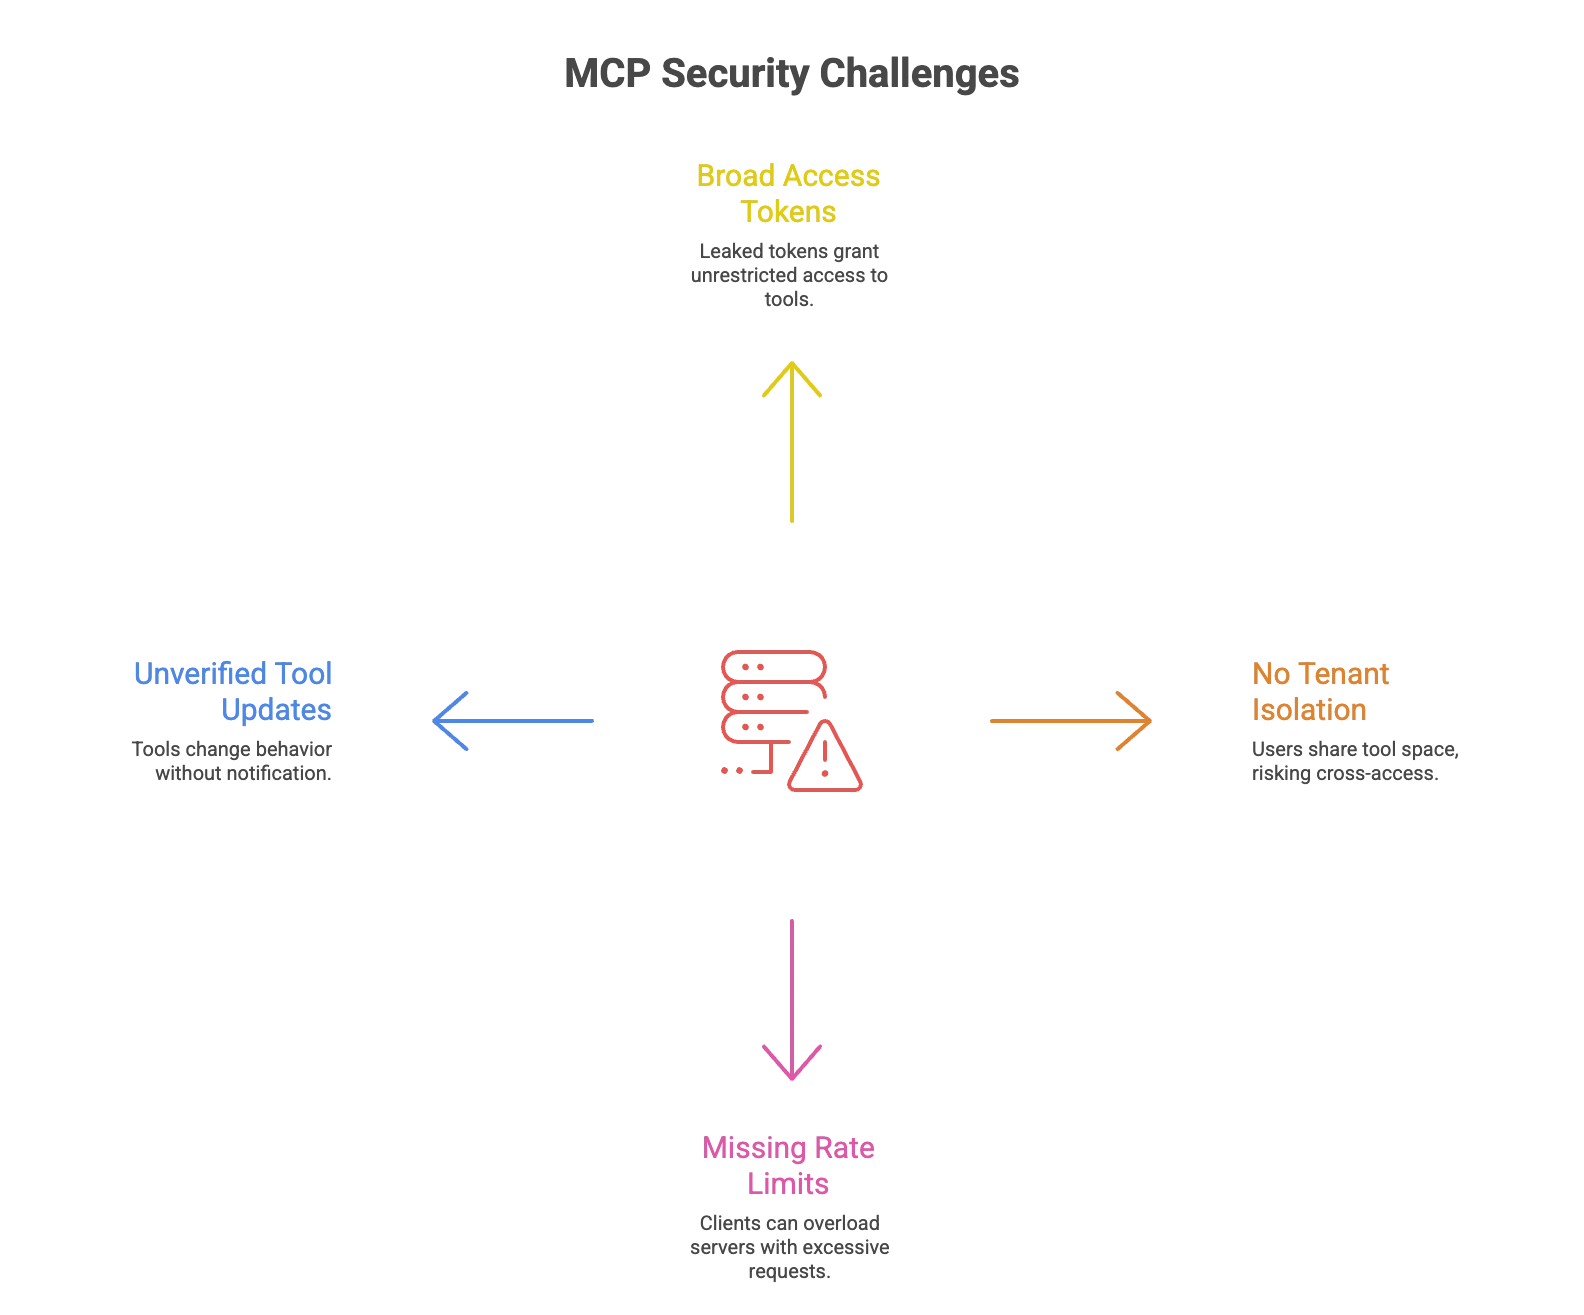
Security challenges in MCP
MCP servers and tools face some recurring security problems:
- Broad access tokens: Many servers rely on long-lived static tokens. If leaked, these can be used to access any tool without restriction.
- No tenant isolation: In multi-user or multi-organization setups, all users share the same tool space. This can lead to accidental or malicious cross-access.
- Missing/Misconfigured rate limits: Without request throttling, AI agents can unintentionally overwhelm MCP servers by triggering tools much faster than human users would. This makes rate limiting a critical consideration in MCP setups.
- Unverified tool updates: Tools can be redefined silently without any notification to the client, changing behavior after approval.
- Lack of auditing: Users and developers can’t always see what changed, when, or by whom.
Common attack areas
Security research efforts, such as “The Vulnerable MCP Project”, have identified several repeatable attack vectors. Below are five that are most relevant when building or integrating an MCP server:
- Tool Poisoning Attacks: Malicious instructions are hidden in tool descriptions to cause unauthorized actions like data exfiltration. A seemingly innocent tool could contain hidden instructions to read sensitive files.
- Rug Pulls: Silent Redefinition: Tools change their behavior silently after initial approval to perform malicious actions, such as rerouting API keys. Most clients don’t notify users of these changes.
- Cross-Server Tool Shadowing: A malicious server can intercept calls intended for a trusted server, exploiting the LLM’s trust (Confused Deputy).
- Insecure Credential Storage: Storing API keys in plaintext makes them vulnerable to theft. This is observed in tools for GitLab, Postgres, Google Maps, and third-party connectors.
- Line Jumping Attack: Prompt injections can be made via tool descriptions to bypass security measures before user approval or tool invocation. This exploits the fact that clients update context with tool descriptions upon connection.
Such MCP vulnerabilities affect all deployment scenarios, from local development servers to production systems handling LLM agent interactions across networks.
Note: Security isn’t just about individual tools, it’s about how they combine. As highlighted in recent research, combining private data access, untrusted input handling, and external communication in a single tool chain creates serious security risks. This “lethal trifecta” is especially dangerous in agent-based workflows
Security scanning and community resources
Valuable resources exist to help address the above MCP security challenges:
VulenrableMCP.info, a community-driven database documenting known issues, limitations, and security concerns specific to MCP implementations.
MCP-Scan provides dedicated security scanning capabilities with two operational modes:
- Static Scan Mode: Scans tool descriptions and server metadata for known patterns like prompt injection, shadowing, and silent behavior changes.
- Proxy Mode: Sits between the client and server to inspect live traffic. It can apply rules such as:
- Allow only certain tools
- Block Personally Identifiable Information (PII) or secret leakage
- Enforce token masking
With the foundational understanding of the MCP security landscape, we can now explore how OAuth 2.0 and Role-Based Access Control (RBAC) provide structured solutions for controlling access and enforcing proper authorization in MCP deployments.
Improving security for MCP server deployments
Identifying challenges and vulnerabilities in MCP servers is only the first step. To build production-ready MCP servers, we need to implement proven security patterns for authentication and authorization. Moving away from static API tokens to dynamic, user-scoped access controls ensures better protection and governance.
The two-pillar security approach
To comprehensively secure MCP deployments, we focus on two fundamental security areas:
Authentication: Verifying the identity of users and systems attempting to access MCP tools. This answers the question “Who are you?” and ensures that only legitimate entities can interact with the server.
Access Control: Determining what authenticated users are permitted to do once their identity is verified. This addresses “What can you access?” and prevents privilege escalation or unauthorized tool usage.
Traditional MCP implementations often rely on static API tokens that provide all-or-nothing access. The binary approach to MCP security fails both authentication and access control requirements; tokens don’t identify specific users, and they typically grant unrestricted access to all available tools. Our security enhancement strategy addresses these limitations through industry-standard protocols.
OAuth 2.0 for authentication
OAuth 2.0 provides a robust framework for handling authentication in distributed systems. Rather than sharing credentials directly, OAuth enables secure token-based authentication with several key advantages for MCP environments:
- Enhanced Security: Replaces static tokens with short-lived, scoped, and access tokens
- Standardized Authentication: Supports secure flows like Authorization Code Grant with Proof Key for Code Exchange (PKCE)
- Delegated Authorization: Users and tools can grant only the necessary permissions
- Identity Provider Integration: Seamless login via GitHub, Google, or enterprise IdPs like Keycloak
- Token Lifecycle Management: Built-in support for token expiration and refresh cycles
Combined with OpenID Connect (OIDC), it adds an identity layer that enables the server to retrieve and validate user identity securely. So, the server can authenticate requests and enforce access controls based on user roles and scopes.
Role-based access control (RBAC)
RBAC controls authorization (“what you can do”). RBAC allows us to assign permissions based on user roles, replacing simplistic token-based access with granular, role-aware enforcement.
In traditional token-based systems, access is binary, anyone with a valid token can call any available endpoint. With RBAC, we define specific roles like viewer, user, and admin, each with a distinct set of allowed actions. This pattern supports least-privilege access and can be dynamically extended as requirements evolve.
The RBAC model consists of three core components:
- Roles represent user categories (e.g., admin, user, viewer)
- Permissions are specific capabilities (e.g., read:tools, manage:roles)
- Role-Permission Mapping: Associates roles with their allowed permissions
Implementation with Keycloak
For our implementation, we’ll use Keycloak as the identity provider to demonstrate these security patterns in practice. Keycloak is a production-grade, open source identity and access management solution that supports OAuth 2.0 (authorization framework for granting scoped access), OIDC (OpenID Connect, used for authentication on top of OAuth), and SAML (Security Assertion Markup Language, commonly used in enterprise SSO environments) out of the box.
Keycloak is particularly well-suited for MCP server deployments because it offers:
- Self-hostable deployment options with Docker and Kubernetes support
- Comprehensive support for OIDC, custom scopes, realms, and client management
- Built-in RBAC capabilities and session management
- Flexibility for both development and enterprise environments
You can download Keycloak or run it locally using Docker:
docker run -p 8080:8080 -e KEYCLOAK_ADMIN=admin -e KEYCLOAK_ADMIN_PASSWORD=password quay.io/keycloak/keycloak:latest start-dev
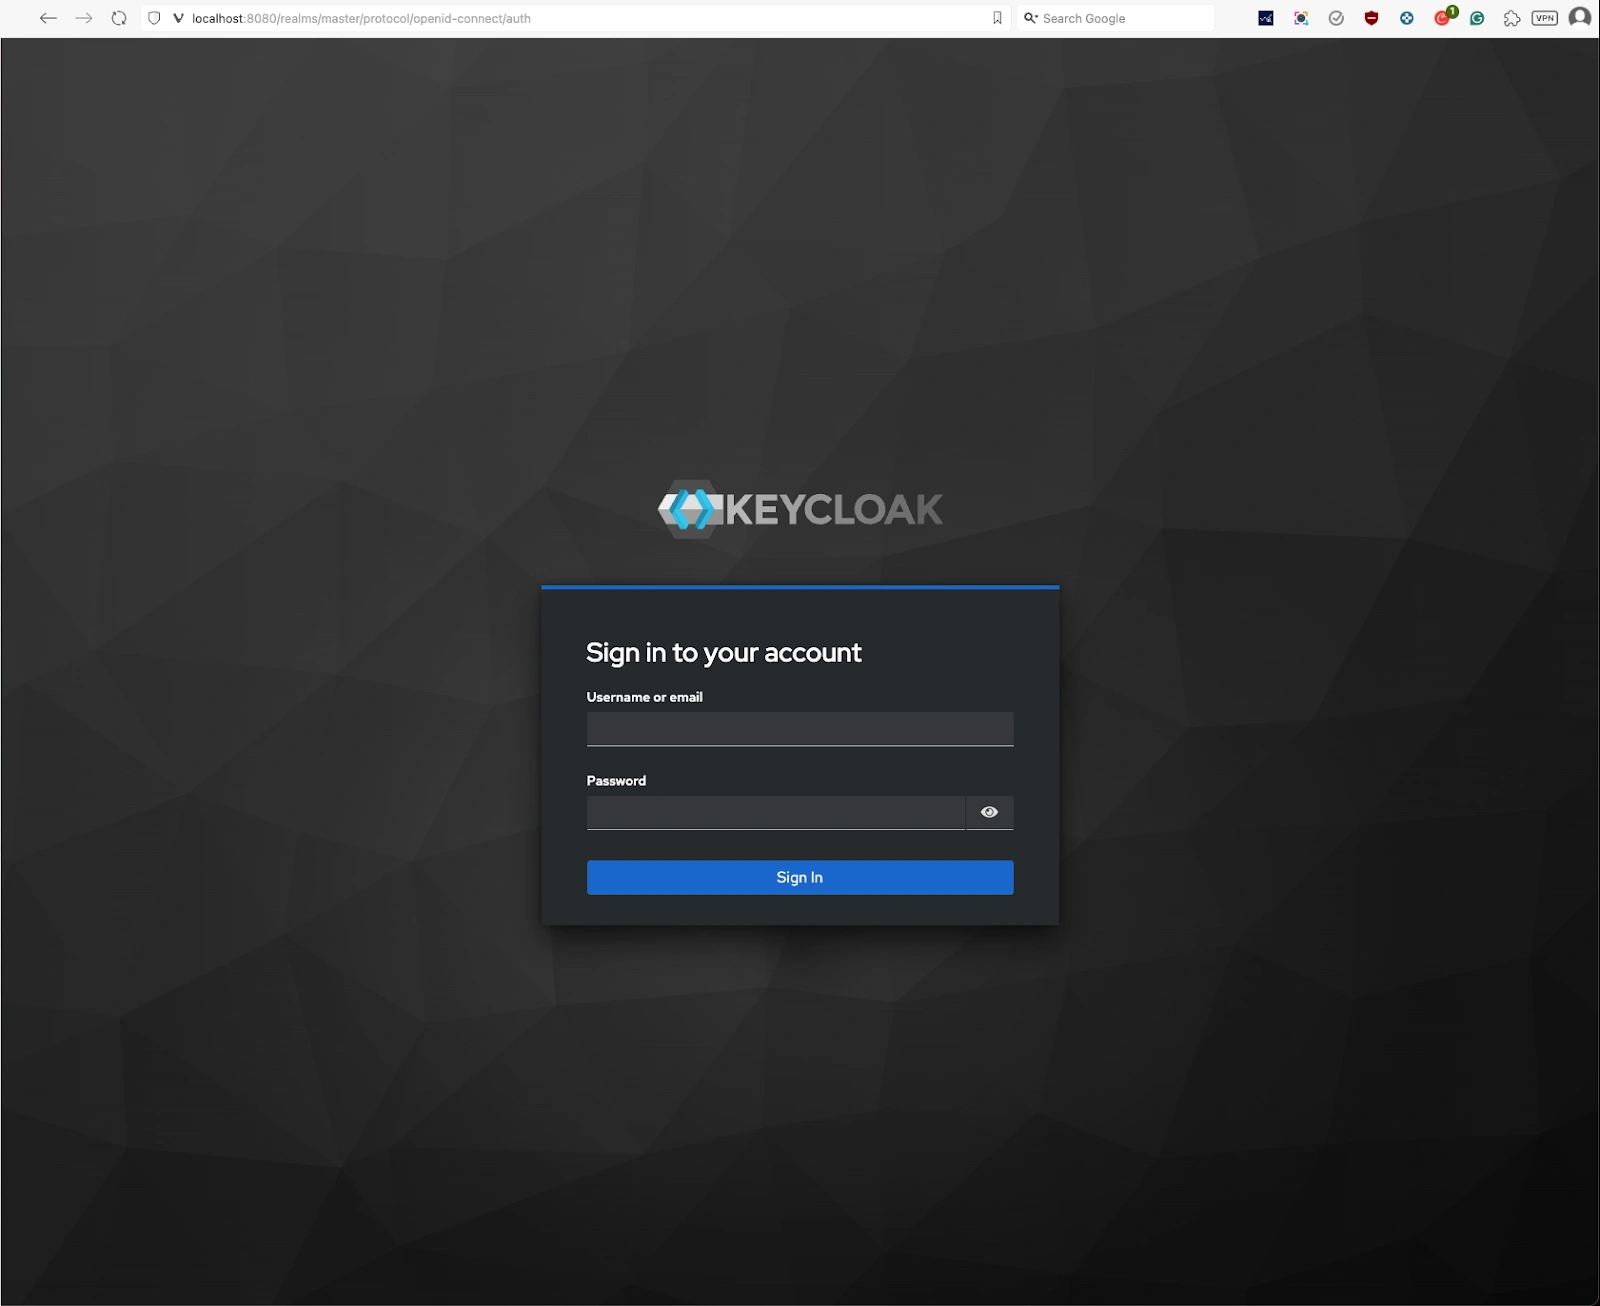
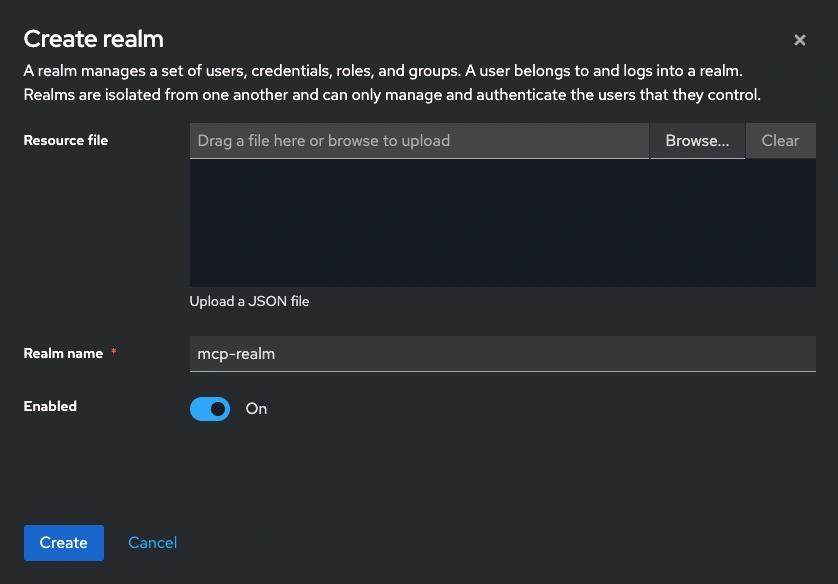
Create a realm
A realm in Keycloak represents a tenant that manages a separate set of users, clients, and security policies. Each realm provides complete isolation and can be configured independently for different environments.
- Navigate to Manage realms after logging in to the Keycloak admin console
- Click Create realm and name it something like mcp-realm
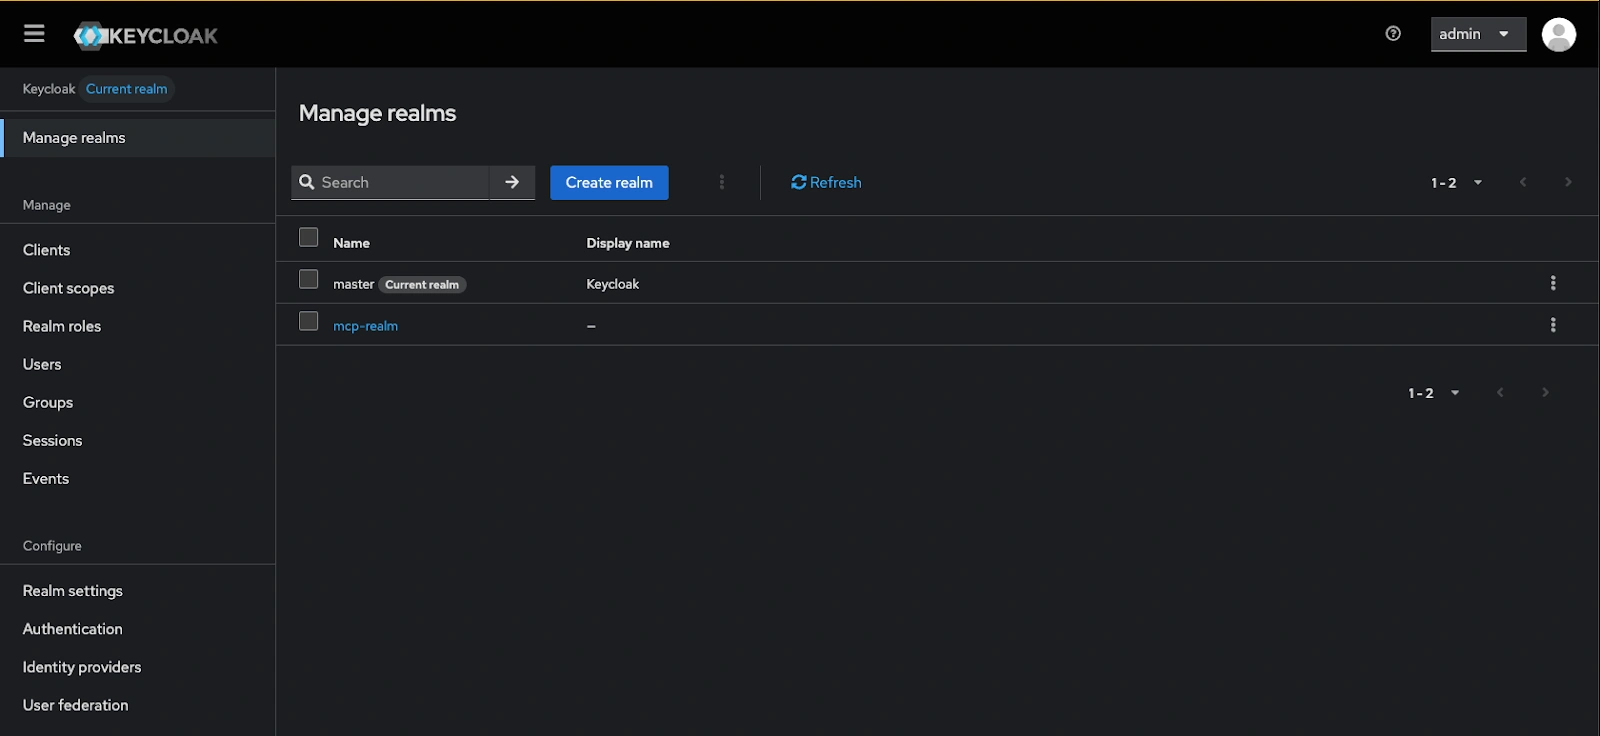
This separation allows you to maintain distinct configurations for development, staging, and production environments without cross-contamination.
Configuring OAuth clients
In OAuth 2.0 terminology, a “client” refers to any application that requests access to protected resources on behalf of a user. In our MCP context, the MCP server itself acts as an OAuth client; it needs to authenticate users and obtain access tokens to validate their requests.
To configure the MCP server as an OAuth client:
- Select
mcp-realmfrom Manage realms - Go to Clients → Create Client and perform the following in General settings:
- Set Client ID:
mcp-client - Select OpenID Connect as the client protocol.
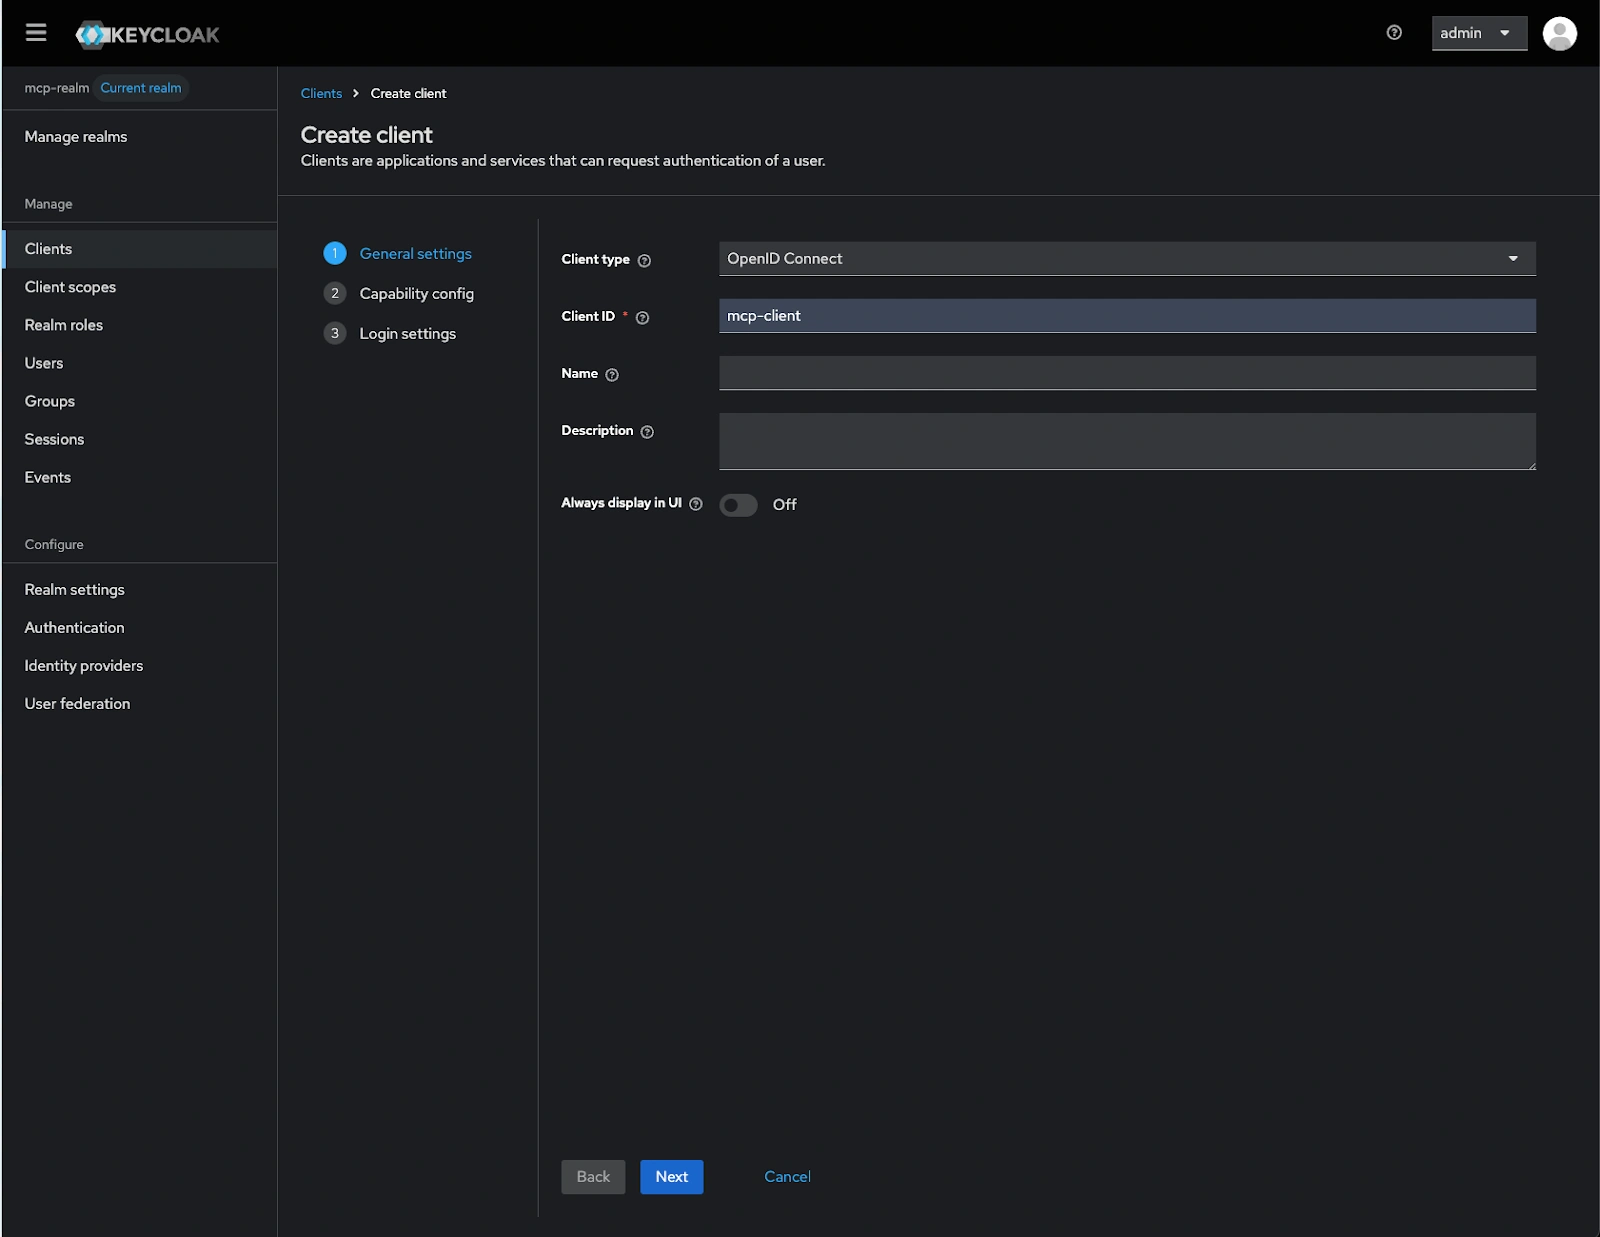
- Set Client ID:
- Click Next and configure the Capability settings:
- Client authentication: ON
- Service accounts roles: ON
- Standard flow: ON
- Direct access grants: ON
- Standard Token Exchange: ON
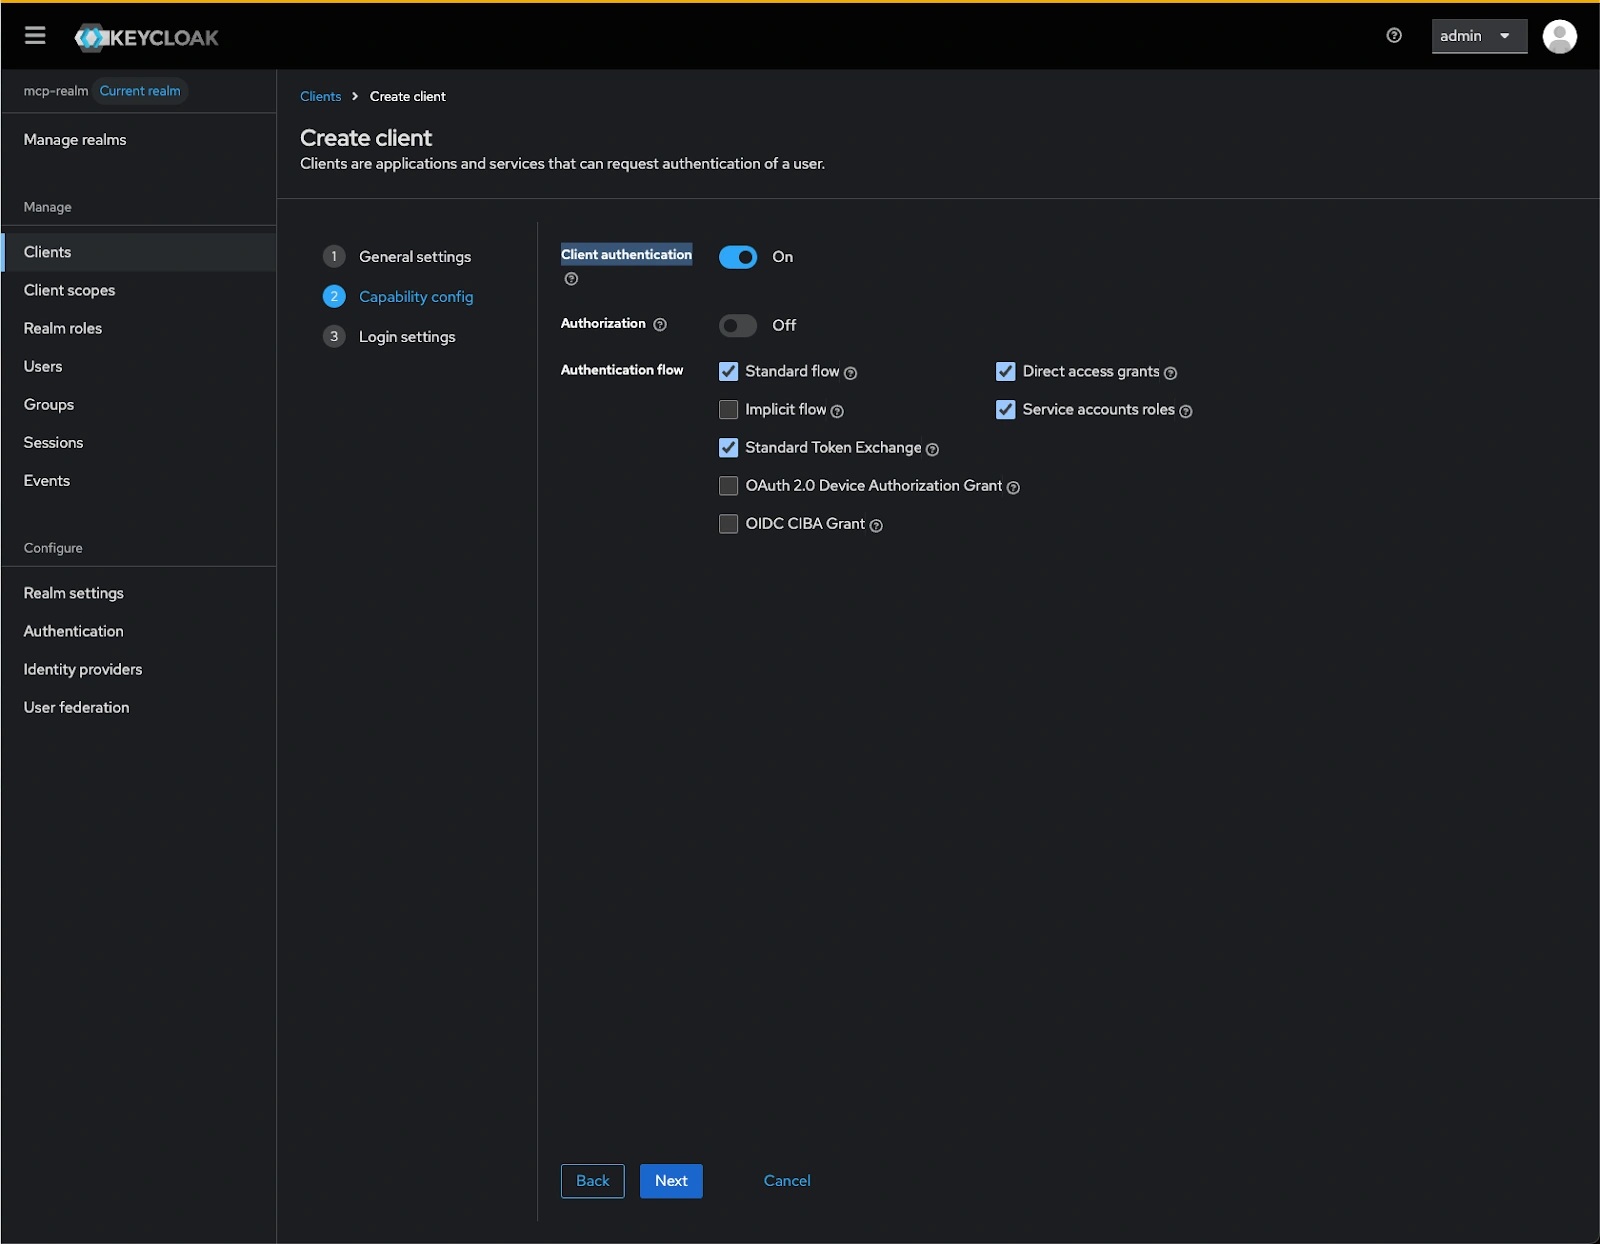
- Click Next and update the Login setting:
- Valid redirect URIs: http://localhost:8081/callback
- Web origins: http://localhost:8081
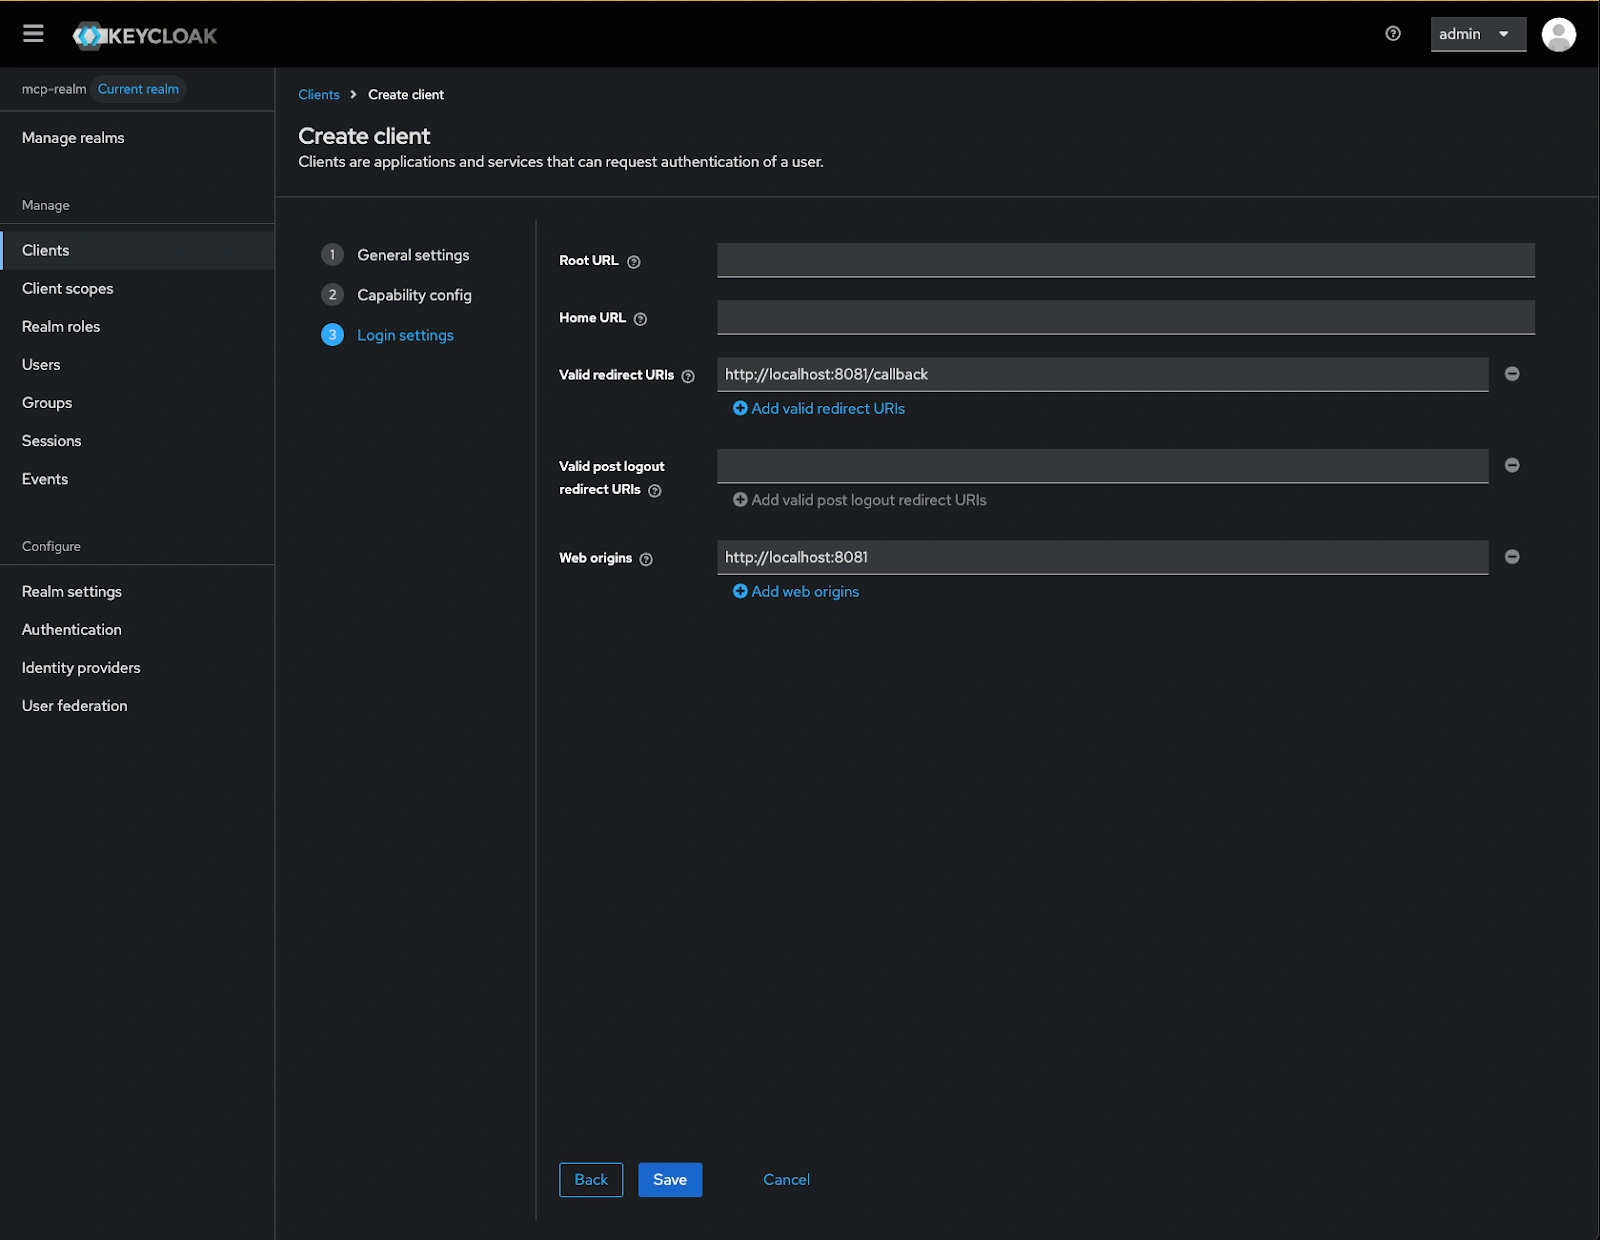
- Click Save to create the client configuration
Generating client credentials
After creating the client, we need to obtain the client secret that the MCP server will use to authenticate itself with Keycloak during the OAuth flow.
-
Select
mcp-clientfrom the list of clients and click on Credentials tab to access the authentication settings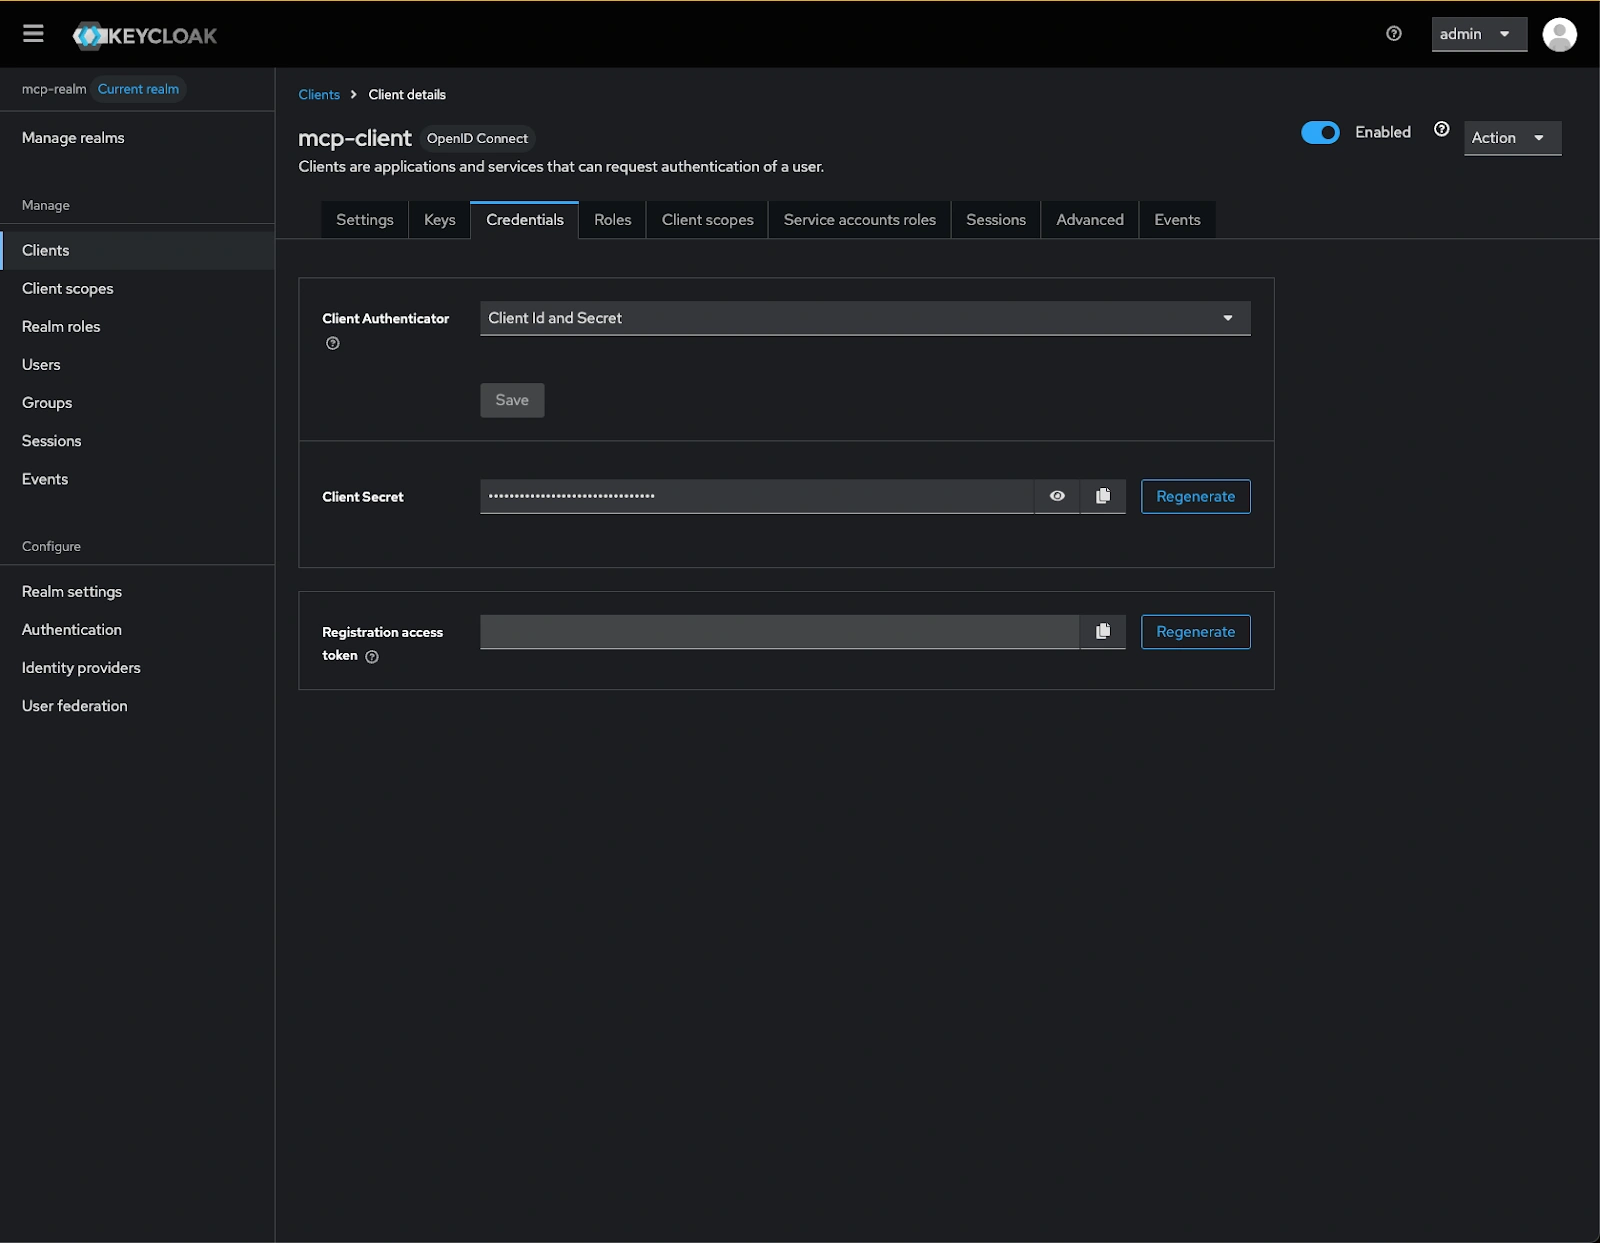
-
Copy the Client Secret, this credential will be used in the MCP server’s environment variables to authenticate API requests to Keycloak.
This client secret acts as a password for the MCP server when communicating with the identity provider and should be stored securely.
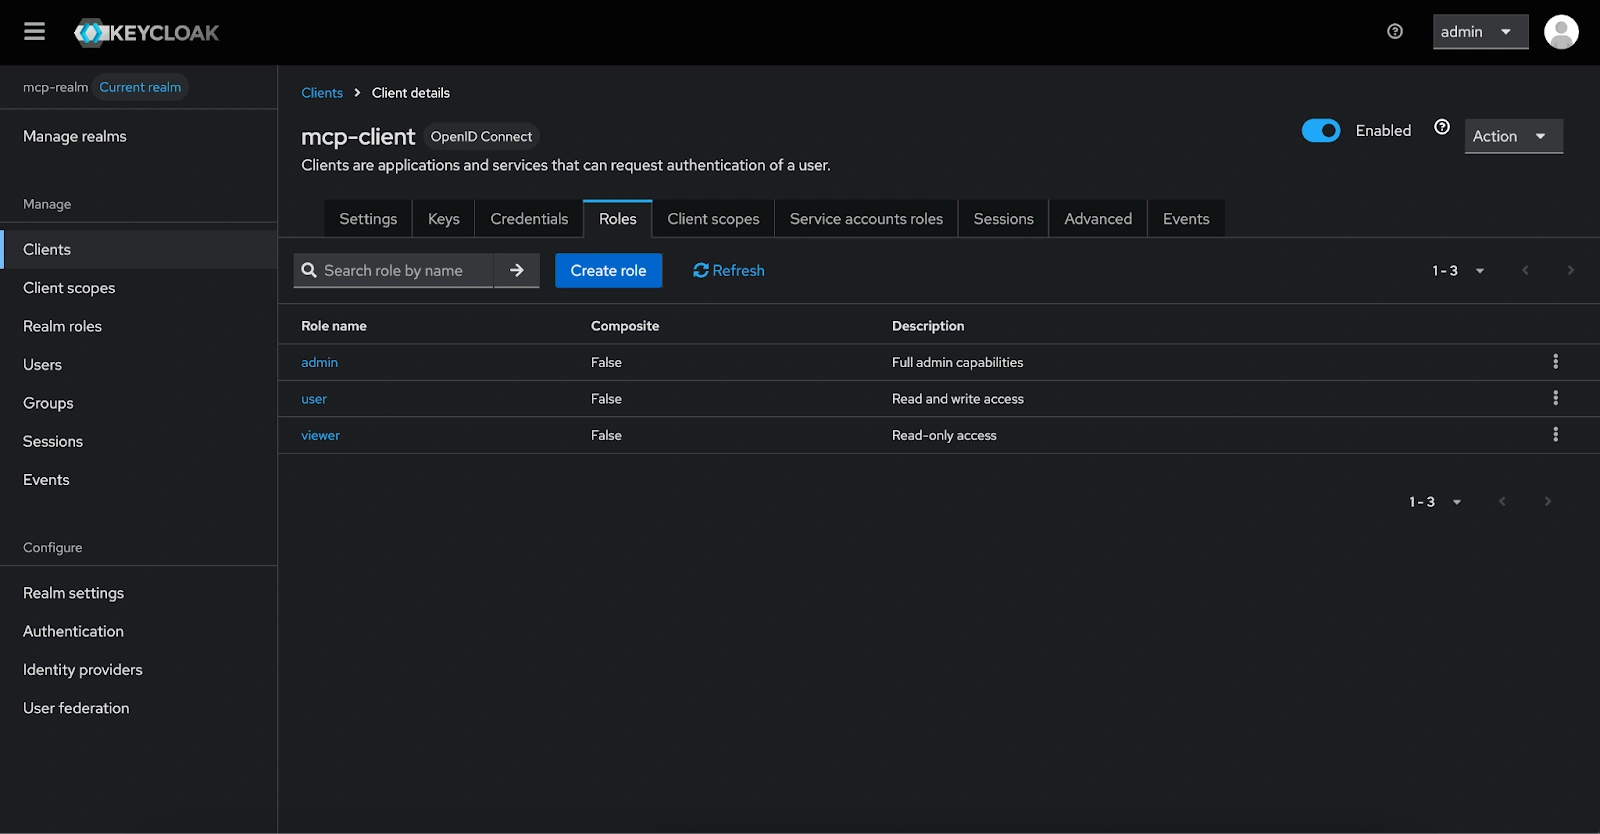
Define client roles
Roles define access levels and permissions for users.
- In the mcp-client client, select the Roles tab and click on Create role to define the following roles:
- viewer: Read-only access
- user: Read and write access
- admin: Full admin capabilities
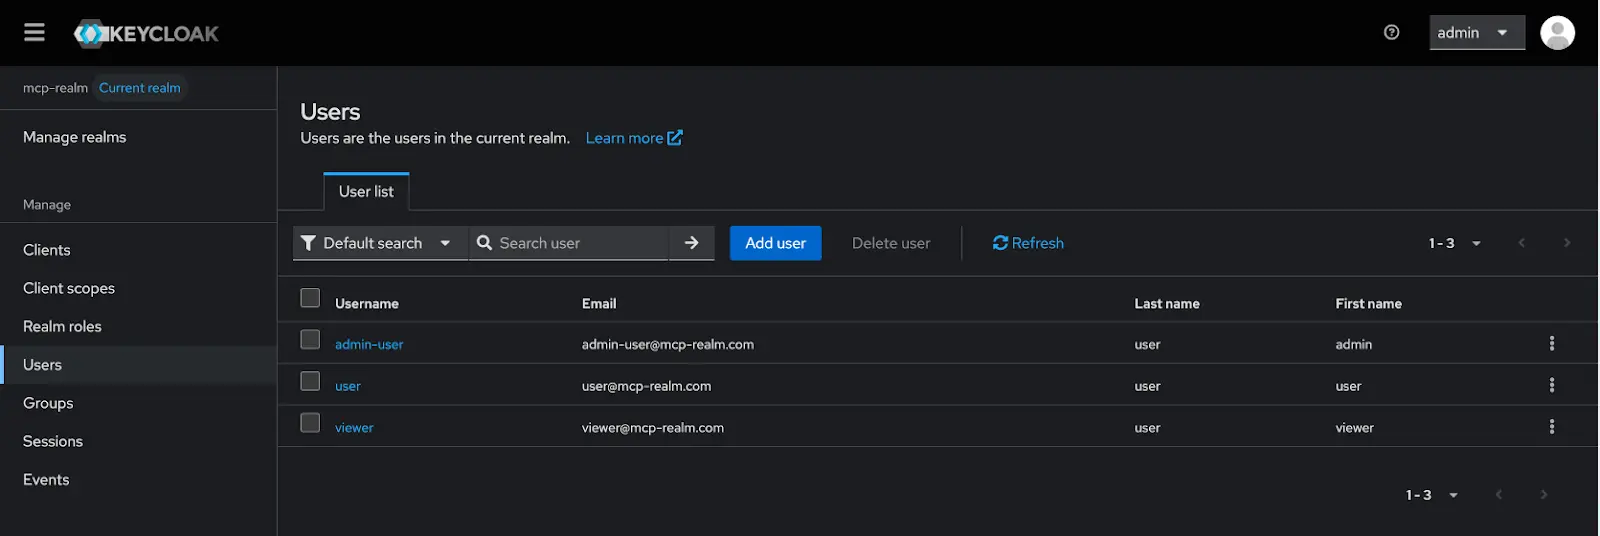
Create users and assign roles
- For each role, create a test user in the Users tab > Add user:
- Email verifies: ON
- Username: viewer / user / admin
- Email: viewer / user / admin @mcp-realm.com
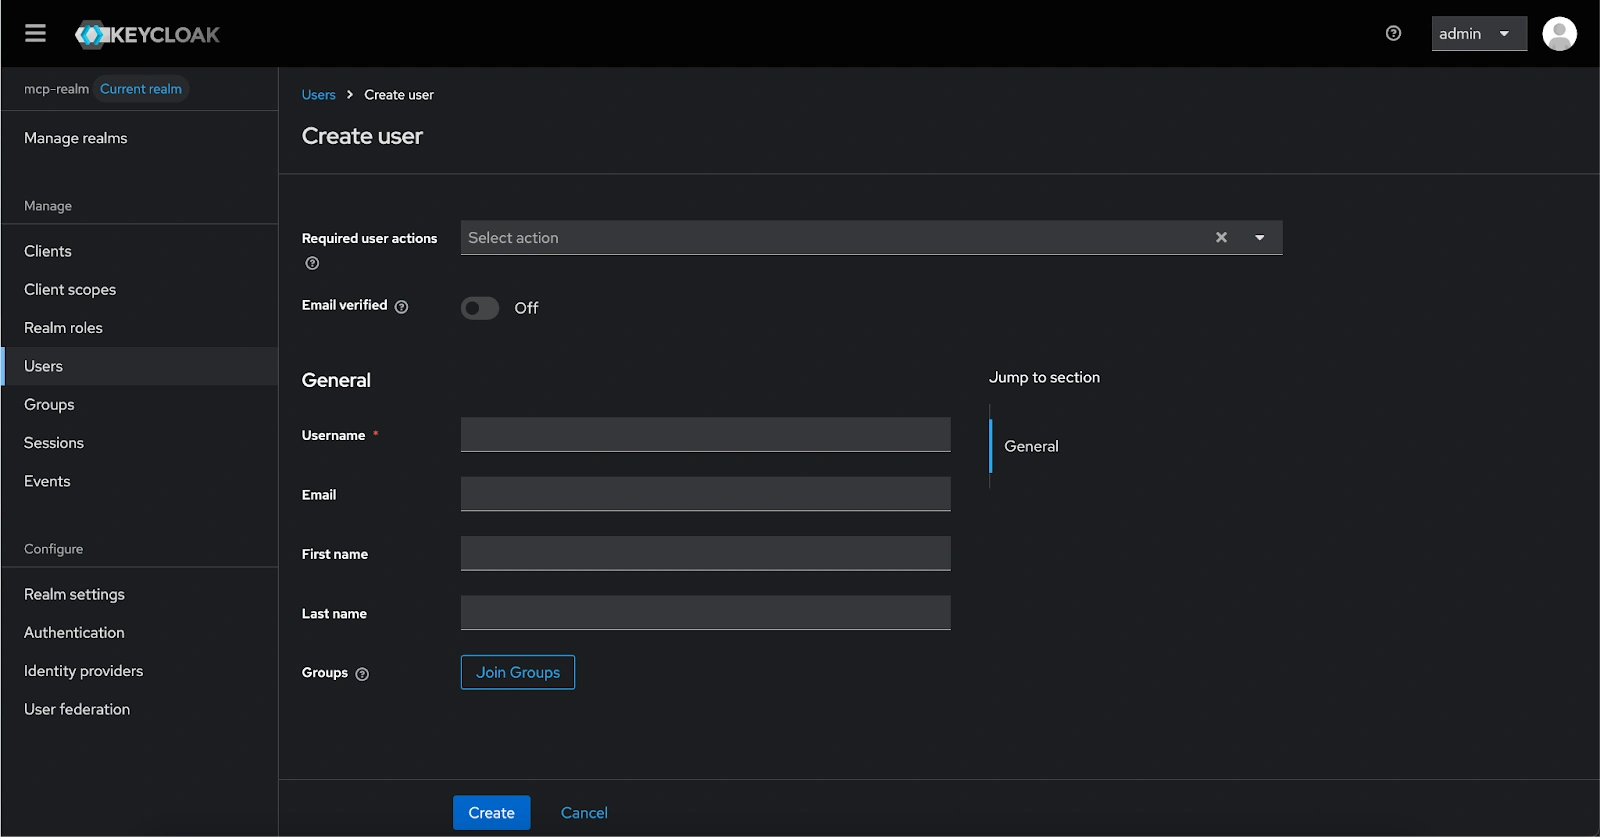
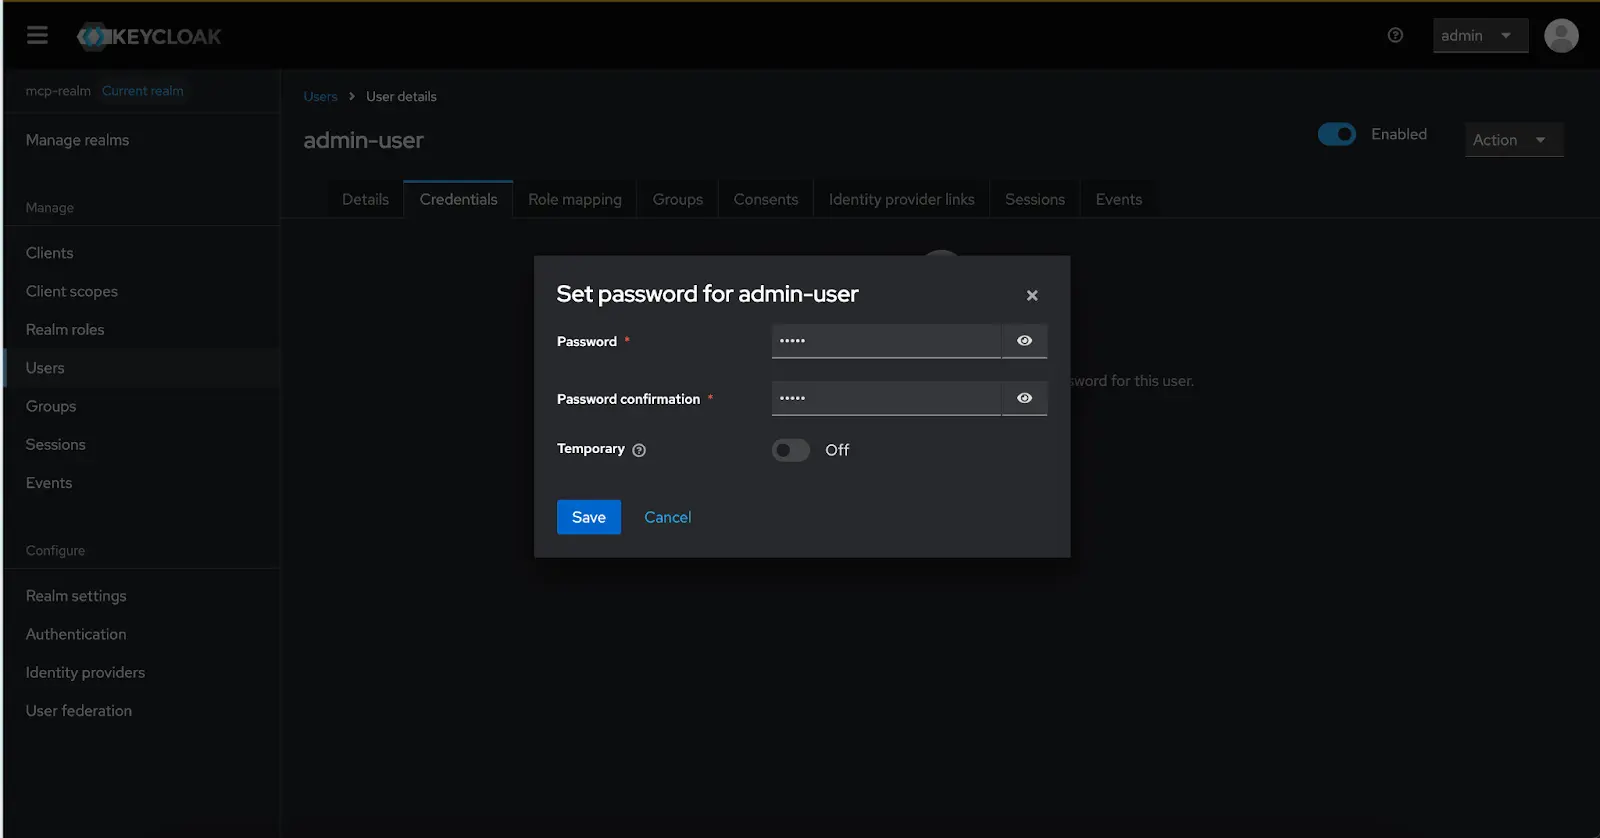
- Click Create and in the User details page navigate to Credentials tab and select Set password, and input the following:
- Temporary: OFF
- Password: 12345
-
Next, navigate to assign the appropriate role under Role Mappings → Assign Roles → mcp-client
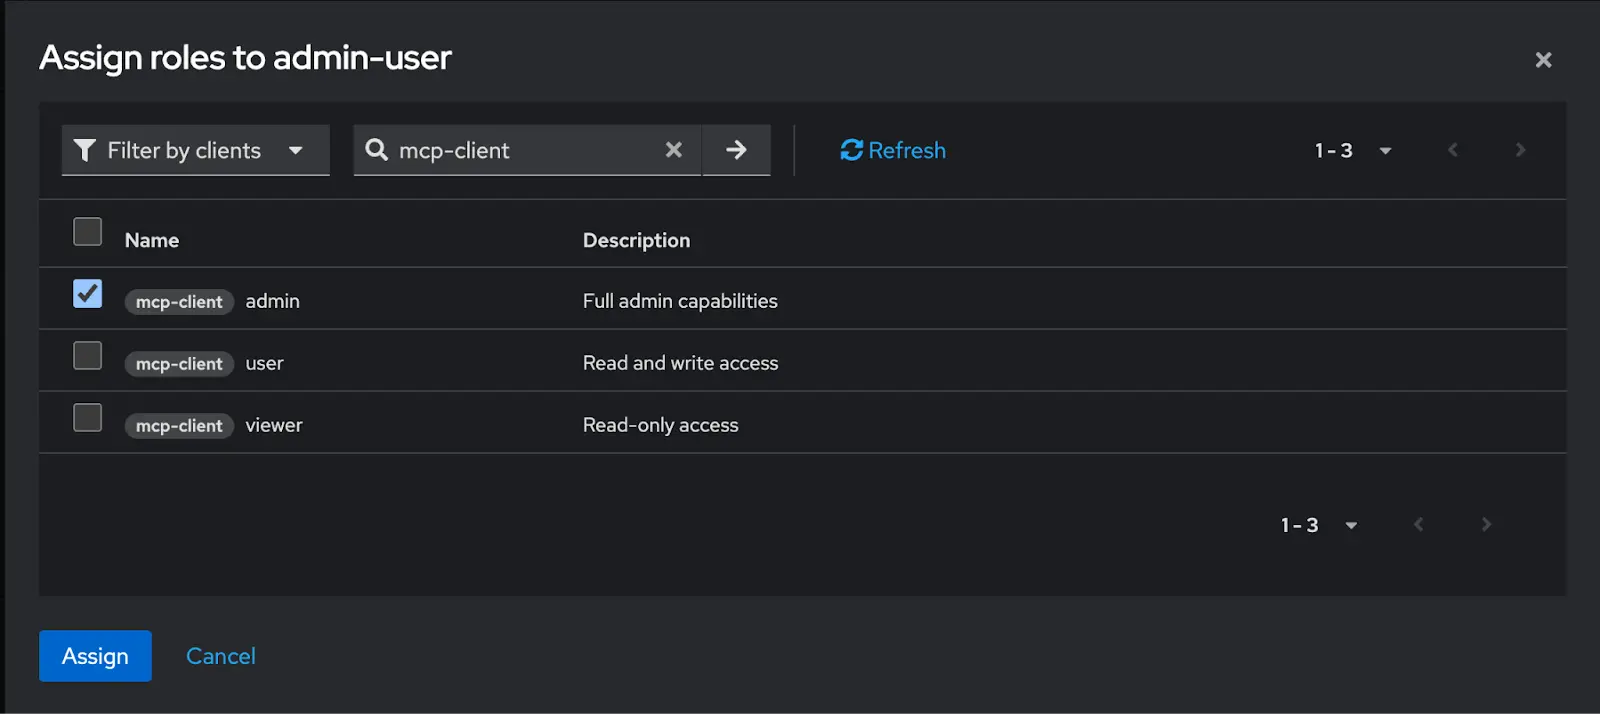
This lets you test login and access control for each user profile.
Now, to use test the scopeMapping of each user, we need the respective password token from each user, so trigger the below curl:
curl --location 'http://0.0.0.0:8080/realms/mcp-realm/protocol/openid-connect/token' \
--header 'Content-Type: application/x-www-form-urlencoded' \
--data-urlencode 'grant_type=password' \
--data-urlencode 'client_id=mcp-client' \
--data-urlencode 'client_secret=<your-copied-client-secret> \
--data-urlencode 'username=viewer' \
--data-urlencode 'password=12345'
The response will look like this:
{

  "access_token": "eyJhbGciOiJSUz……",
  "expires_in": 300,
  "refresh_expires_in": 1800,
  "refresh_token": "eyJhbGciOiJIUz……",
  "token_type": "Bearer",
  "not-before-policy": 0,
  "session_state": "7f9c1e5d-39a3-4109-9641-643171bb8bcf",
  "scope": "email profile"
}
Copy the access_token, this will be needed in the MCP server’s environment variables next.
Practical implementation: building a secure GitHub MCP server
In this section, we’ll walk through a practical and production-ready setup of a secure GitHub MCP server. Building on our previous implementation, we now introduce authentication with OAuth 2.0 (via Keycloak), role-based access control (RBAC), secure configuration management, and tool-level permissioning.
Use case covered
This demo extends the GitHub-focused MCP server with:
- OAuth 2.0 integration using Keycloak as the identity provider
- RBAC support for mapping users to specific permissions
- Tool-level access control, enforcing what tools a user can invoke
- Meta-tooling to inspect and understand access levels (get_my_permissions)
This setup allows teams to restrict access to tools like create_issue to certain roles, while still enabling broader visibility through tools like list_prs. Source code for GitHub MCP Server.
Prerequisites
To get started, you’ll need:
- Golang 1.19 or later
- GitHub Personal Access Token with appropriate permissions
- Claude Desktop
- Keycloak (self-hosted or remote) url, realm, client-id, client secret, and user access token
Installation
-
Clone the repository.
git clone <REPO> cd github-mcp-server git checkout secure -
Install the dependencies.
go mod tidy -
Set the environment variable.
 export GITHUB_TOKEN="your_github_token_here"
 export KEYCLOAK_URL="http://localhost:8080"
 export KEYCLOAK_REALM="mcp-realm"
 export OAUTH_CLIENT_ID="mcp-client"
 export OAUTH_CLIENT_SECRET="your-client-secret"
 export MCP_AUTH_TOKEN="your-user-access-token"
Code structure
The enhanced project introduces modular layers for security:
github-mcp-server/
├── auth/
│   ├── oauth.go        # OAuth flow implementation
│   ├── rbac.go         # Role-based access control
│   └── middleware.go   # Authentication middleware
├── config/
│   └── security.go     # Security configurations
├── tools/
│   └── github.go       # Enhanced with permission checks
└── main.go             # Updated server with auth
Core security components
OAuth 2.0 integration (auth/oauth.go)
The OAuth implementation handles Keycloak integration and user identity extraction. Here’s the key method for retrieving user information:
func (o *OAuthConfig) GetUserInfo(ctx context.Context, token *oauth2.Token) (*UserInfo, error) {
    // Parse JWT token to extract user identity and roles
    parts := strings.Split(token.AccessToken, ".")
    if len(parts) != 3 {
        return nil, fmt.Errorf("invalid token format")
    }

    // Decode and parse token payload
    payload, err := base64.URLEncoding.DecodeString(parts[1])
    if err != nil {
        return nil, fmt.Errorf("failed to decode token payload: %v", err)
    }

    userInfo := &UserInfo{}
    if err := json.Unmarshal(payload, userInfo); err != nil {
        return nil, fmt.Errorf("failed to parse token payload: %v", err)
    }

    // Extract roles from ResourceAccess or fallback to userinfo endpoint
    if userInfo.ResourceAccess.MCPClient.Roles == nil {
        // Fallback to /userinfo endpoint
        // ... additional logic for role extraction
    }

    return userInfo, nil
}
This approach parses JWT tokens directly for performance while maintaining a fallback to the userinfo endpoint for comprehensive role extraction.
Authentication middleware (auth/middleware.go)
The middleware validates Bearer tokens and injects user context:
func (am *AuthMiddleware) Authenticate(next http.Handler) http.Handler {
    return http.HandlerFunc(func(w http.ResponseWriter, r *http.Request) {
        authHeader := r.Header.Get("Authorization")
        if authHeader == "" {
            http.Error(w, "No authorization header", http.StatusUnauthorized)
            return
        }

        bearerToken := strings.TrimPrefix(authHeader, "Bearer ")
        token := &oauth2.Token{AccessToken: bearerToken}

        userInfo, err := am.oauth.GetUserInfo(r.Context(), token)
        if err != nil {
            http.Error(w, fmt.Sprintf("Failed to get user info: %v", err), http.StatusUnauthorized)
            return
        }

        // Add user info to context for downstream handlers
        ctx := context.WithValue(r.Context(), UserContextKey, userInfo)
        next.ServeHTTP(w, r.WithContext(ctx))
    })
}
The validation ensures that all authenticated requests carry user info. And context-based injection keeps auth logic out of tool handlers.
RBAC implementation (auth/rbac.go)
The RBAC system maps roles to specific permissions:
// RolePermissions maps roles to their allowed permissions
var RolePermissions = map[Role][]Permission{
	RoleAdmin: {
		PermissionReadTools,
		PermissionWriteTools,
		PermissionManageUsers,
		PermissionManageRoles,
	},
	RoleUser: {
		PermissionReadTools,
		PermissionWriteTools,
	},
	RoleViewer: {
		PermissionReadTools,
	},
}

// HasPermission checks if a user with given roles has a specific permission
func HasPermission(userRoles []string, requiredPermission Permission) bool {
	for _, roleStr := range userRoles {
		// Convert role to lowercase for case-insensitive comparison
		roleLower := strings.ToLower(roleStr)
		for role, permissions := range RolePermissions {
			// Compare roles case-insensitively
			if strings.EqualFold(string(role), roleLower) {
				for _, permission := range permissions {
					if permission == requiredPermission {
						return true
					}
				}
			}
		}
	}
	return false
}
Explanation:
- Roles like admin, user, viewer have different permission scopes.
- HasPermission is called before executing any tool logic.
Secure configuration loader (config/security.go)
The security configuration centralizes all sensitive settings:
// NewSecurityConfig creates a new security configuration from environment variables
func NewSecurityConfig() *SecurityConfig {
	return &SecurityConfig{
		KeycloakURL:       getEnvOrDefault("KEYCLOAK_URL", "http://localhost:8080"),
		KeycloakRealm:     getEnvOrDefault("KEYCLOAK_REALM", "mcp-realm"),
		OAuthClientID:     getEnvOrDefault("OAUTH_CLIENT_ID", ""),
		OAuthClientSecret: getEnvOrDefault("OAUTH_CLIENT_SECRET", ""),
		ServerPort:        getEnvOrDefault("SERVER_PORT", "8081"),
		AllowedOrigins:    []string{"http://localhost:8081"},
	}
}
This approach centralizes configuration validation, avoids hardcoded secrets, and simplifies deployment across different environments.
Tool-level security implementation
Tool registration with wrapWithAuth
To enforce RBAC per tool, we wrap handlers using wrapWithAuth.
s.AddTool(createIssueTool, wrapWithAuth(authMiddleware, auth.PermissionWriteTools, createIssueHandler))
The wrapWithAuth function:
func wrapWithAuth(am *auth.AuthMiddleware, permission auth.Permission, handler toolHandler) toolHandler {
    return func(ctx context.Context, req mcp.CallToolRequest) (*mcp.CallToolResult, error) {
        // Extract user info from context
        userInfo, ok := ctx.Value(auth.UserContextKey).(*auth.UserInfo)
        if !ok || userInfo == nil {
            return mcp.NewToolResultError("authentication required"), nil
        }

        // Check permissions
        if !auth.HasPermission(userInfo.Roles, permission) {
            return mcp.NewToolResultError("permission denied"), nil
        }

        // Execute original handler
        return handler(ctx, req)
    }
}
Meta-tool for access introspection
To help users understand their access levels, we provide a get_my_permissions tool:
func getMyPermissionsHandler(ctx context.Context, req mcp.CallToolRequest) (*mcp.CallToolResult, error) {
    userInfo, ok := ctx.Value(auth.UserContextKey).(*auth.UserInfo)
    if !ok || userInfo == nil {
        return mcp.NewToolResultError("failed to get user information"), nil
    }

    permissions := auth.GetUserPermissions(userInfo.Roles)

    var output strings.Builder
    output.WriteString("🔑 Your Access Details:\n\n")

    // Display roles
    output.WriteString("Roles:\n")
    for _, role := range userInfo.Roles {
        output.WriteString(fmt.Sprintf("- %s\n", role))
    }

    // Display available tools based on permissions
    output.WriteString("\nAvailable Tools:\n")
    if auth.HasPermission(userInfo.Roles, auth.PermissionReadTools) {
        output.WriteString("- list_prs, list_issues, search_issues\n")
    }
    if auth.HasPermission(userInfo.Roles, auth.PermissionWriteTools) {
        output.WriteString("- create_issue\n")
    }

    return mcp.NewToolResultText(output.String()), nil
}
The meta-tool enables users to understand their runtime permissions, making debugging and onboarding significantly easier. Next, we’ll explore how to deploy this securely and integrate it with Claude Desktop
Building and testing the secure implementation
Previously, we had already integrated the GitHub MCP Server to Claude Desktop. We’ll extend the same integration with Authentication.
Build the server binary
Compile the Go program to produce an executable binary with the latest changes:
cd /path/to/your/github-mcp-server
go build -o bin/github-mcp-server main.go
You can also download the build file directly from the repo.
Configuration updates
Edit the Claude Desktop configuration file (e.g., ~/Library/Application Support/Claude/claude_desktop_config.json on macOS). Update entries for your MCP servers within the mcpServers object:
{
  "mcpServers": {
    "secure-github": {
      "command": "/path/to/github-mcp-server",
      "env": {
	    "GITHUB_TOKEN": "your_actual_github_personal_access_token"
        "OAUTH_CLIENT_ID": "your_client_id",
        "OAUTH_CLIENT_SECRET": "your_client_secret",
        "KEYCLOAK_URL": "http://localhost:8080",
        "KEYCLOAK_REALM": "mcp-realm"
      }
    }
  }
}
Restart Claude Desktop: For changes to take effect. You can also go back to Developer Settings of Claude Desktop to check the configuration:
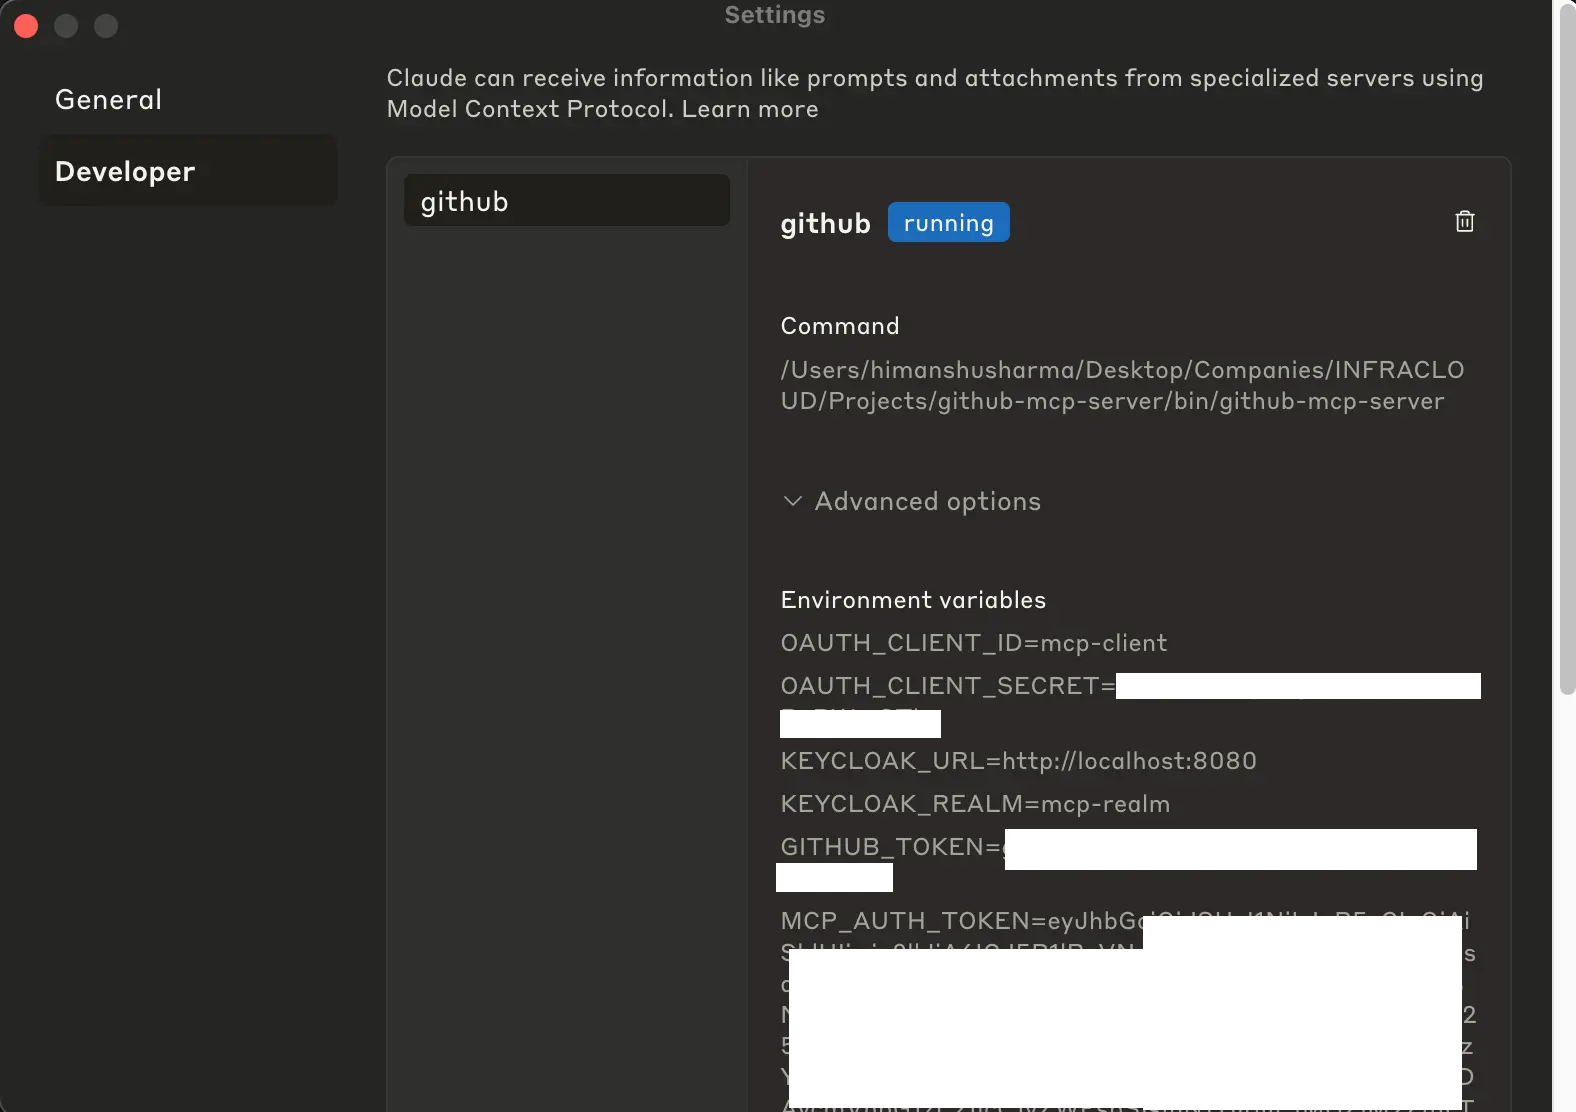
Let’s now go ahead and test it.
Authentication flow testing
Once the configuration is complete, you can interact with your MCP servers using natural language prompts like on Claude Desktop:
- “List all open PRs in gptscript-ai/gptscript”
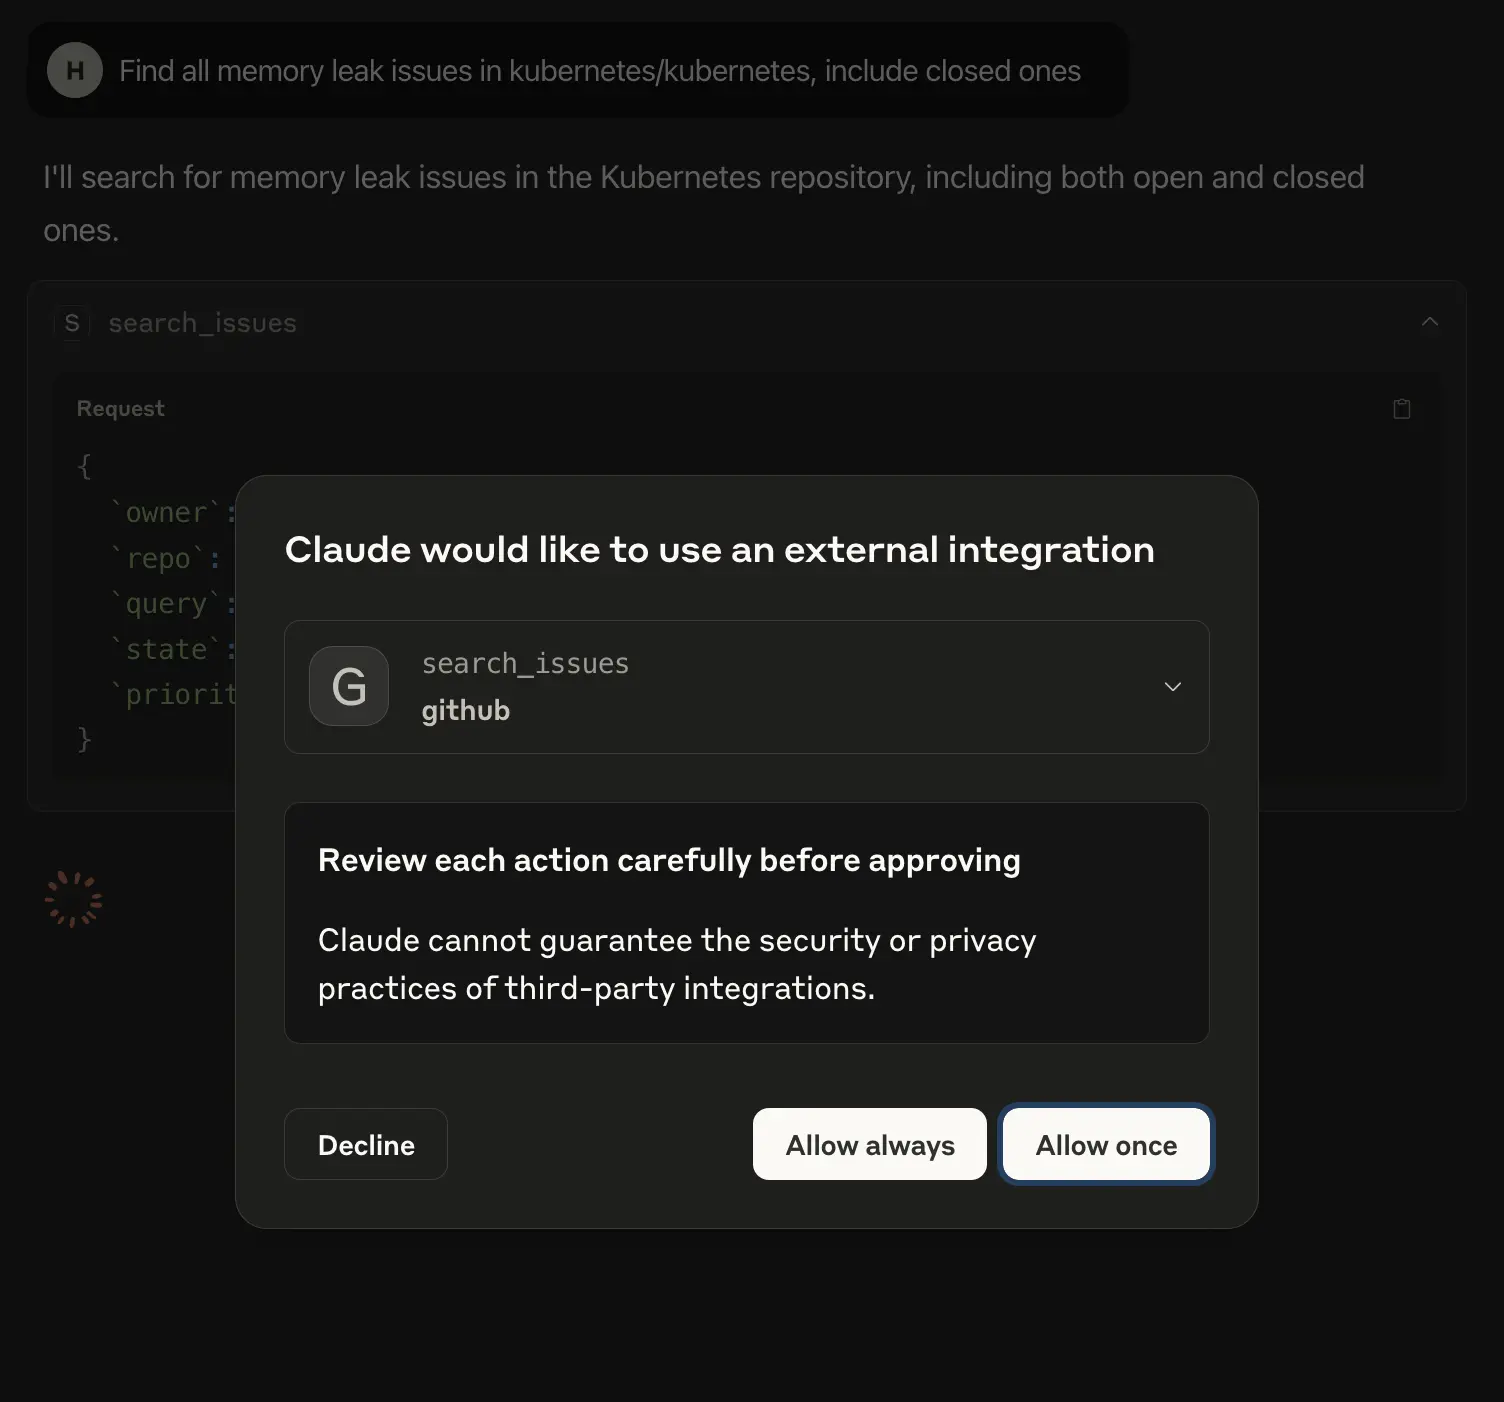
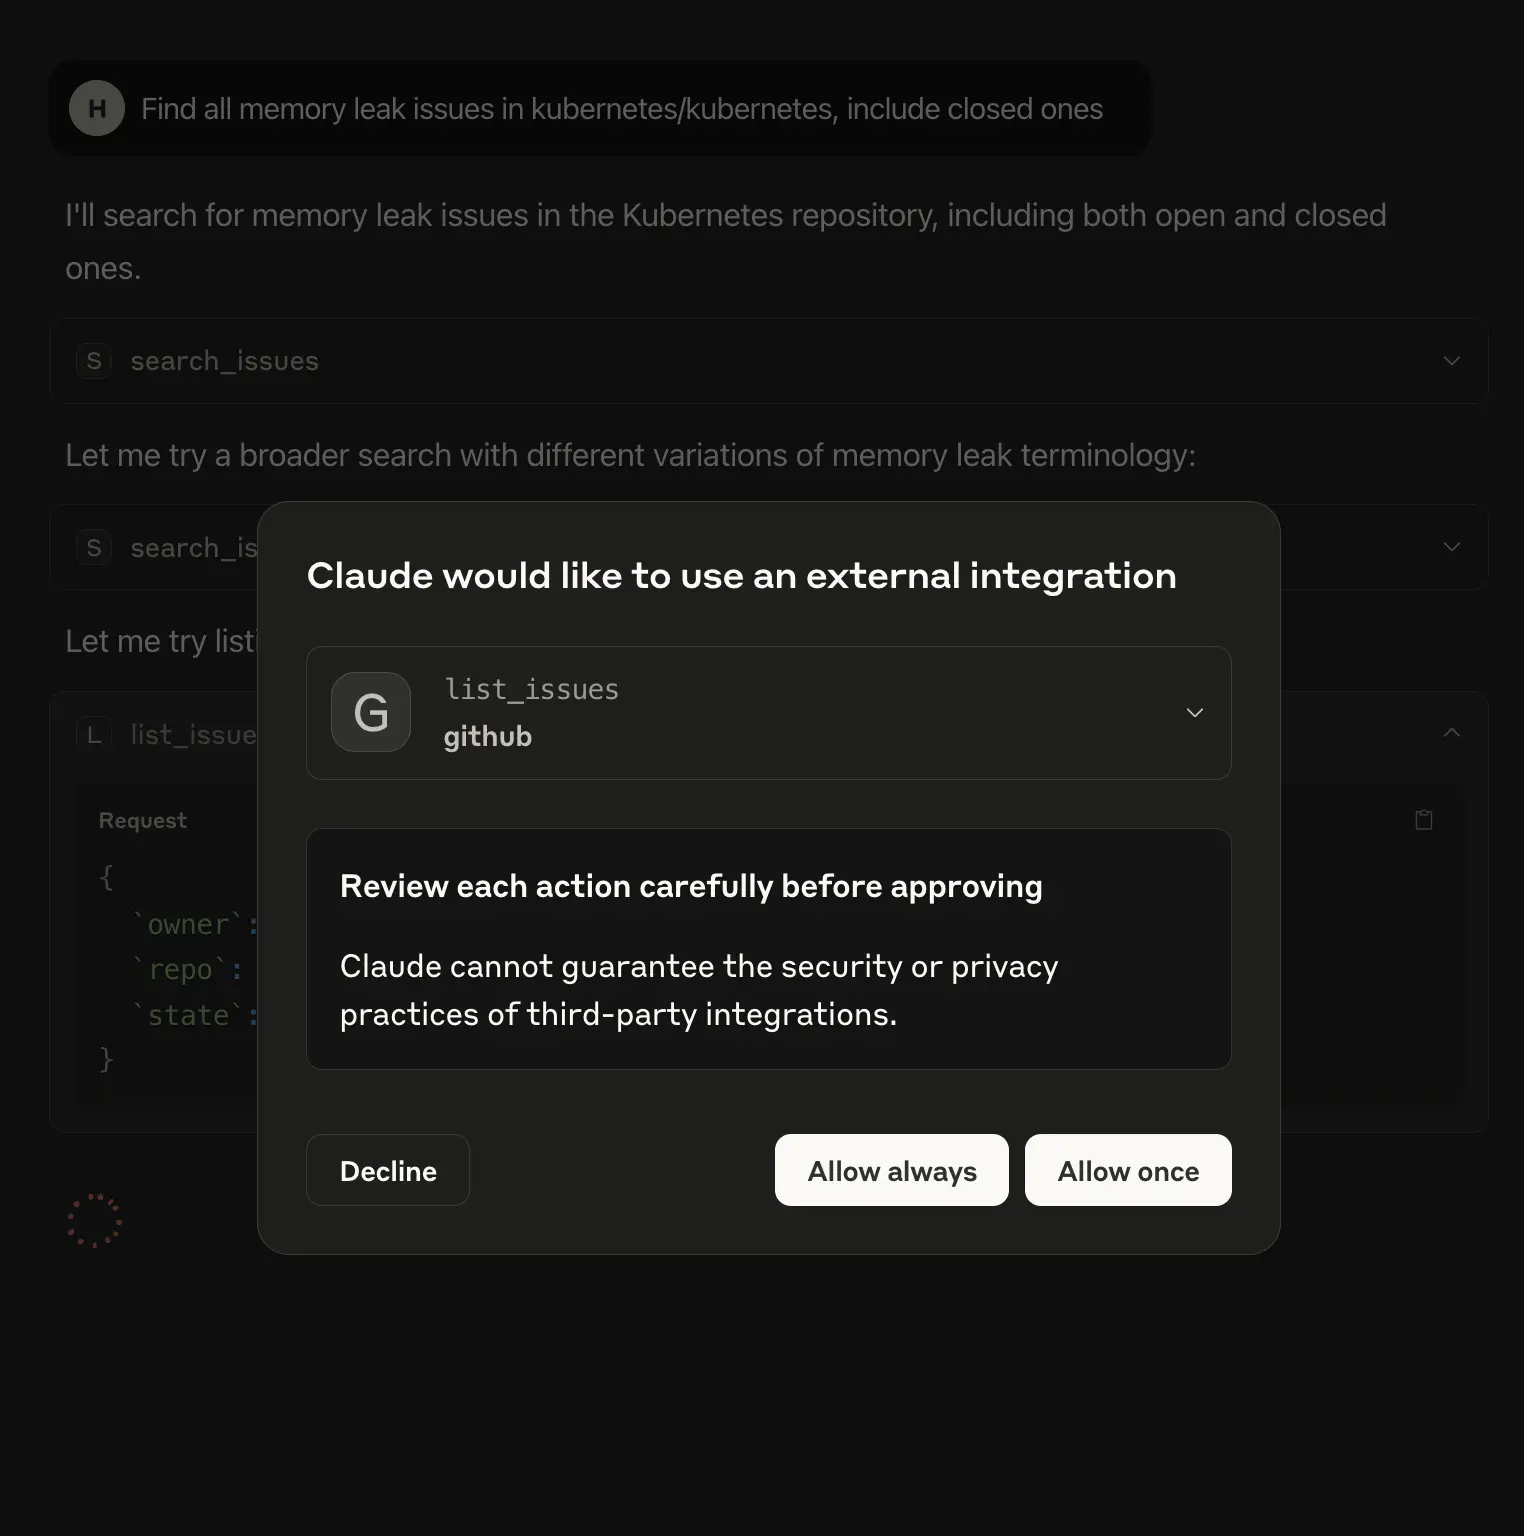
- “Find all memory leak issues in kubernetes/kubernetes, including closed ones”
- “Create a GitHub issue in the kubernetes/kubernetes repo about flaky tests in the CI pipeline”
Note:
- To test each scenario, you have to update your claude desktop config each time
- Claude’s desktop will ask for access to perform all these tasks.
Permission meta info example:
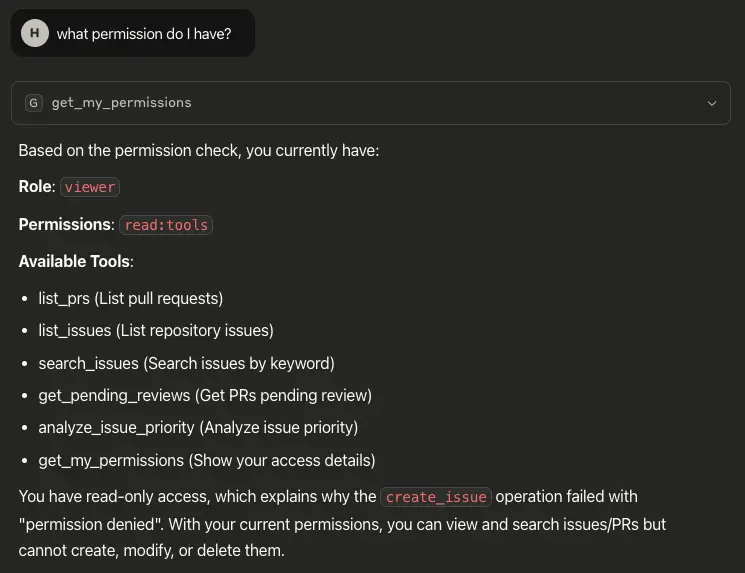
The response from the get_my_permissions tool clearly summarizes the user’s current role, permission scope, and the specific tools they are allowed to use. It also explains why certain operations, like create_issue, are denied based on read-only access.
Empty access token example:
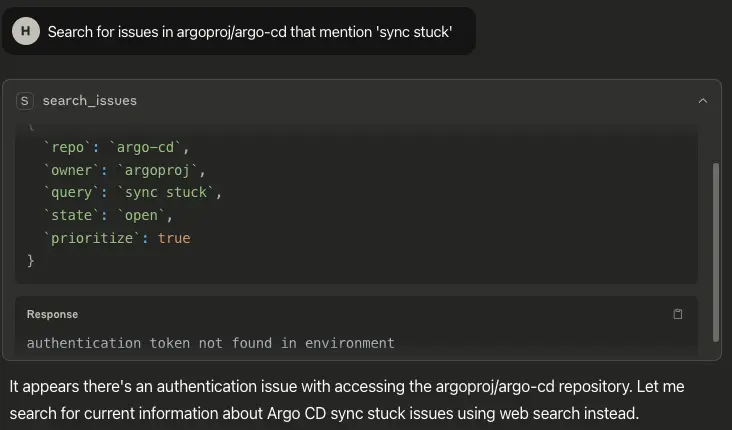
The output demonstrates what happens when a request is made without a valid authentication token in the environment. The agent attempts to use the search_issues tool, but the server responds with an error: “authentication token not found in environment”. This indicates that the MCP server is correctly enforcing token-based authentication before allowing access to GitHub APIs.
Viewer access example:
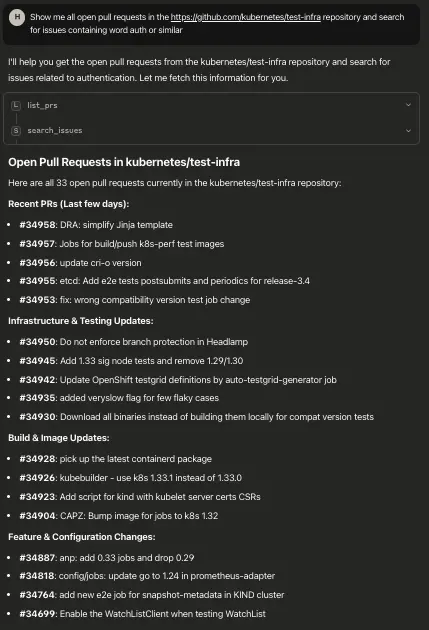
The output shows how a user with the viewer role can successfully invoke tools like list_prs and search_issues. The server responds with a detailed list of open pull requests from the kubernetes/test-infra repository, demonstrating read-only access in action, tools execute correctly, but no modifying actions (like create_issue) are permitted.
User access example:
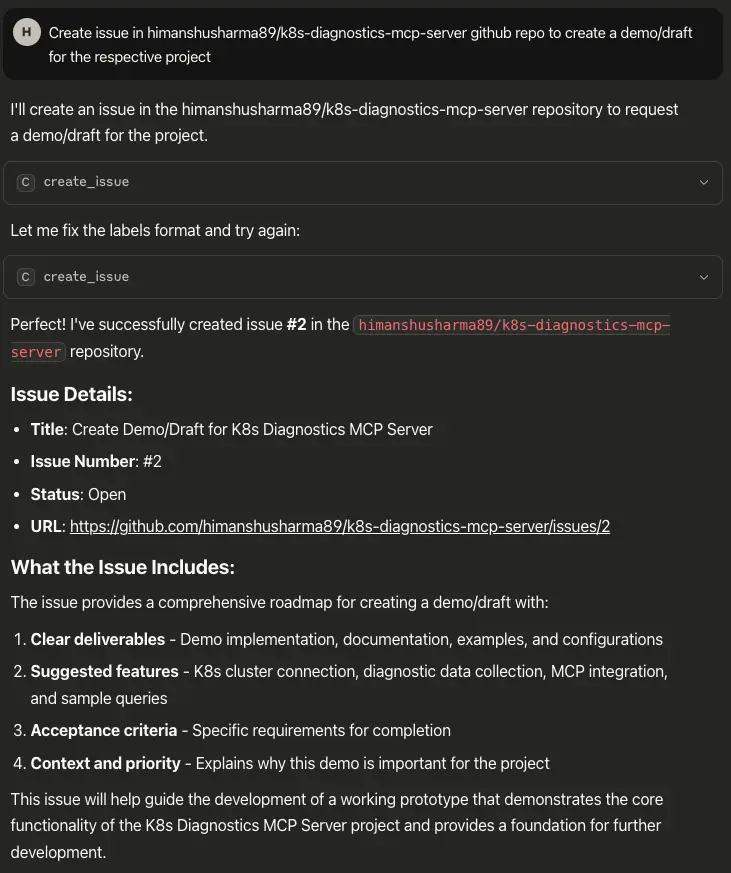
The above example shows a successful invocation of the create_issue tool by a user with the user role, which includes write:tools permissions. The agent is able to open a new issue in a GitHub repository, complete with a structured title, content, and metadata. We can see that write-level permissions enable users to go beyond viewing or listing and perform actions like issue creation. This shows how our RBAC scope mapping and configuration are working perfectly
Designing for advanced use cases
While this guide focuses on securing request-time execution using OAuth 2.0 and RBAC, there are broader design patterns worth considering for future MCP implementations. In our earlier post, we covered MCP best practices like stateless design, structured logging, and scoped credentials, along with architectural patterns such as scheduled execution, nested tools, and multi-tool servers.
Those patterns remain important as agent-based workflows grow more complex. In this blog post, we focused on identity and access controls as the foundation, but real-world use cases often demand even stricter policies, especially in enterprise environments. To understand what that looks like in practice, we can look at Claude Code.
Learning from Claude Code: Enterprise-grade MCP security
Claude Code, Anthropic’s own agent development environment, is built on MCP and offers a useful reference for implementing security in mature environments. Its Identity and Access Management (IAM) system includes multiple layers of control that go beyond basic role-based access.
Tiered permission system
Claude Code uses a tiered permission system to balance power and safety, categorizing tools by risk level:
- Read-only tools (file reads, ls, grep): No approval required
- Bash commands: Require approval, with “don’t ask again” behavior per project directory
- File modifications: Require approval until session end
This approach addresses the security challenge of balancing usability with safety - a critical consideration for any MCP deployment.
Fine-grained tool permissions
Claude Code implements permission rules using the format Tool(optional-specifier). For example:
Bash(npm run test:*)- Allows bash commands starting with “npm run test”Edit(docs/**)- Permits editing files in the docs directoryWebFetch(domain:example.com)- Restricts web requests to specific domains
This granular approach directly addresses the “broad access token” problem we identified earlier, showing how tools can be restricted to specific operations rather than blanket permissions.
Enterprise policy management
For organizations, Claude Code supports enterprise-managed policy settings that take precedence over user and project settings. System administrators can deploy policies that users cannot override, ensuring consistent security across the organization.
The settings precedence hierarchy follows:
- Enterprise policies (highest)
- Command line arguments
- Local project settings
- Shared project settings
- User settings (lowest)
Key takeaways for MCP security
Claude Code’s implementation offers several lessons for securing MCP servers:
- Progressive trust model: Start with restrictive permissions and allow users to grant additional access as needed, rather than defaulting to broad access.
- Context-aware permissions: Consider the execution context (project directory, session duration) when designing permission systems.
- Centralized policy management: Provide mechanisms for administrators to enforce organization-wide security policies.
- Audit trail: Maintain visibility into what permissions have been granted and when.
These patterns can be adapted to enhance the security posture of any MCP server implementation, whether you’re building a simple single-purpose server or a complex multi-tool platform.
Conclusion
We learned how to build a secure GitHub MCP server with OAuth 2.0 authentication and role-based access control (RBAC) using Keycloak. The authentication and RBAC replace static tokens with scoped, user-specific access, enforcing permissions at the middleware level. Each tool is registered with explicit access requirements, and the get_my_permissions meta-tool enables users to inspect their roles and capabilities.
The design supports natural language interactions via Claude Desktop while maintaining strict access control for roles like viewer, user, and admin. Its modular structure—covering secure config loading, context-aware auth, and per-tool RBAC—makes it easy to extend with new tools or tenant-specific policies. Although orchestration and scheduling aren’t covered yet, this architecture provides a solid foundation for secure, LLM-integrated backends.
While this guide can help you in building secure MCP servers, in the real world, you may encounter various problems and errors. Contact our AI experts if you need help in building secure and scalable AI apps. If you found this guide useful and want to discuss more about MCP and AI agents, feel free to connect with me on LinkedIn.
Stay updated with latest in AI and Cloud Native tech
We hate 😖 spam as much as you do! You're in a safe company.
Only delivering solid AI & cloud native content.
Posts You Might Like