An Introduction to Kubernetes Security using Falco

Let’s talk about Kubernetes security
According to research by MarketsNResearch, the global Kubernetes market is projected to increase from USD 1.8 billion in 2022 to USD 7.8 billion by 2030, exhibiting an impressive Compound Annual Growth Rate (CAGR) of 23.40% during the forecast period. As Kubernetes continues to grow in adoption and more & more applications are built on top of it, it becomes a lucrative target for hackers and exploiters.
However, security is one of the hardest challenges of running Kubernetes according to this analysis.
Why is Kubernetes security difficult?
The reason Kubernetes security is difficult is that there are multiple moving layers in a cloud native stack, hence operators may not focus on security early on. Another contributor is that some distributions of Kubernetes may not be secure by default, contrary to what operators assume.
Prevention and detection for Kubernetes security
Information security is a process that moves through phases building and strengthening itself along the way. Security is a journey, not a destination. Although the Information Security process has multiple strategies and activities, we can group them all into three distinct phases - prevention, detection, and response.
Preventive measures
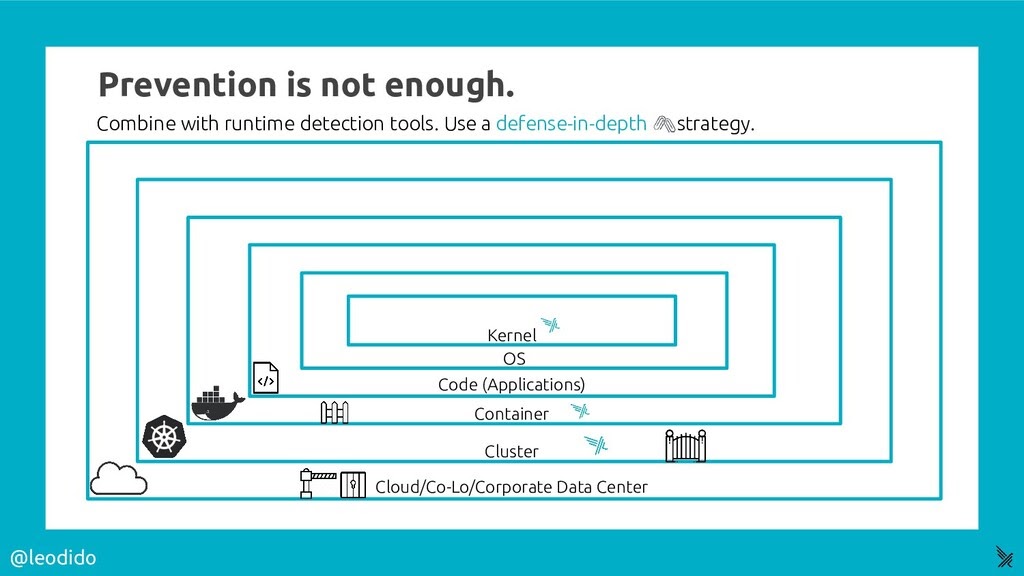
Preventive measures include having proper access control, authentication and authorization in place. No matter what level of protection a system may have, it will get compromised given a greater level of motivation and skill. There is no foolproof “silver bullet” security solution. A defense in-depth strategy should be deployed so when each layer fails, it fails safely to a known state and sounds an alarm. The most important element of this strategy is timely detection and notification of a compromise.
Detective measures
An example of detective measures includes sending logs from security and network devices like host-based intrusion detection systems (HIDS) and network intrusion detection systems (NIDS) to an SIEM and building rules to alert when suspicious activity is seen. According to the defense in-depth approach, we should be auditing and placing detection triggers on multiple layers of the technology stack, from looking at cloud audit logs (like Cloudtrail), the Kubernetes cluster, containers, application code, host OS and the kernel. We will take a look at the detective measures in this blog which will further help us to respond to these threats.

Image credit: @leodido
What is Falco?
Falco is an open source cloud native runtime security project and one of the leading open source Kubernetes threat detection engines. Falco was created by Sysdig in 2016 and is the first runtime security project to join CNCF as an incubation-level project. Falco detects unexpected application behavior and alerts on threats at runtime.
In this blog post, we will use Falco to strengthen Kubernetes security.
How to get started with Falco on Kubernetes?
The below sections cover how you can get started with Falco to monitor Kubenretes for security events.
How to install and run Falco on Kubernetes?
The most secure way to run Falco is to install Falco directly on the host system so that Falco is isolated from Kubernetes in the case of compromise. Then the Falco alerts can be consumed via read-only agents running in Kubernetes. Falco can also be run directly in Kubernetes if isolation is not a concern. We will be setting Falco up using Helm in this tutorial, but you should be aware of the pros and cons of the method you are choosing.
Steps to install Falco on K8s:
Prerequisite: We need a working Kubernetes setup for this. You can use a cloud Kubernetes offering from AWS/GCP or set one up yourself locally using minikube. We also require kubectl and Helm to be installed on your client machine.
Let’s start with the installation of Falco.
-
Add the falcosecurity repo in Helm
$ helm repo add falcosecurity https://falcosecurity.github.io/charts $ helm repo update Hang tight while we grab the latest from your chart repositories... ...Successfully got an update from the "falcosecurity" chart repository ...Successfully got an update from the "stable" chart repository Update Complete. ⎈Happy Helming!⎈ -
Installing the chart
$ helm install falco falcosecurity/falco NAME: falco LAST DEPLOYED: Mon Nov 9 22:09:28 2020 NAMESPACE: default STATUS: deployed REVISION: 1 TEST SUITE: None NOTES: Falco agents are spinning up on each node in your cluster. After a few seconds, they are going to [start monitoring your containers](/observability-consulting/) looking for security issues. No further action should be required. -
After a few seconds Falco should be running, to verify, you will see the pods you created in a moment.
$ helm ls

$ kubectl get pods
Setting up the environment
We will need an environment to emulate the attacks and detect them. Let us set it up. We will be using Helm for this.
Let’s add Helm’s stable repository and install mysql-db chart from it.
$ helm repo add stable https://charts.helm.sh/stable

$ helm repo update
Hang tight while we grab the latest from your chart repositories...
...Successfully got an update from the "falcosecurity" chart repository
...Successfully got an update from the "stable" chart repository
Update Complete. ⎈Happy Helming!⎈
$ helm install mysql-db stable/mysql
NAME: mysql-db
LAST DEPLOYED: Mon Nov 9 22:11:07 2020
NAMESPACE: default
STATUS: deployed
REVISION: 1
NOTES:
MySQL can be accessed via port 3306 on the following DNS name from within your cluster:
mysql-db.default.svc.cluster.local

…
Let us now monitor Falco logs:
$ kubectl get pods
NAME                      READY  STATUS   RESTARTS  AGE
falco-6rr9r               1/1    Running  0         49m
mysql-db-d5dc6b85d-77hrm  1/1    Running  0         47m
ubuntu                    1/1    Running  0         43m

$ kubectl logs -f falco-6rr9r # Replace with your Falco pod name here
Analyzing Falco’s logs
The first steps when an attacker does after they gain access to a Kubernetes cluster is to enumerate available network hosts. An attacker will try to find their way around a seemingly new environment. They can try to use safe/less noisy commands to gain more insights from the cluster. Let us go through the steps an attacker might do and look at the corresponding detection signals from Falco. We will use the default ruleset which comes with Falco, these rules can be tuned as per your needs in your environment. You can find Falco’s default rules here: https://github.com/falcosecurity/falco/tree/master/rules
Terminal shell in container
Description: Detecting terminal shells being spawned in pods. We open a terminal shell on a running pod to replicate the scenario.
$ kubectl exec -it mysql-db-d5dc6b85d-77hrm -- bash -il # Replace with the mysql pod name you have
Detection:
18:08:40.584075795: Notice A shell was spawned in a container with an attached terminal (user=root user_loginuid=-1 k8s.ns=default k8s.pod=mysql-db-d5dc6b85d-77hrm container=3fc8155f9d1a shell=bash parent=runc cmdline=bash -il terminal=34816 container_id=3fc8155f9d1a image=mysql) k8s.ns=default k8s.pod=mysql-db-d5dc6b85d-77hrm container=3fc8155f9d1a
Contact Kubernetes API Server From Container
Description: We run kube-recon, which is a tool which does initial reconnaissance in a Kubernetes environment. This rule detects attempts to contact the Kubernetes API Server from a container.
$ kubectl run kuberecon --tty -i --image octarinesec/kube-recon
/ # ./kube-recon
2020/11/09 18:21:22 Testing K8S API permissions
2020/11/09 18:21:23 Your K8S API Server is configured properly
2020/11/09 18:21:23 Running Nmap on the discovered IPs
2020/11/09 18:21:23 Getting local ip address and subnet
2020/11/09 18:21:23 Trying to download EICAR file
2020/11/09 18:21:23 Downloaded EICAR successfully. No malware protection is in place
Detection:
18:20:45.927730981: Notice A shell was spawned in a container with an attached terminal (user=root user_loginuid=-1 k8s.ns=<NA> k8s.pod=<NA> container=4f63870599d0 shell=sh parent=<NA> cmdline=sh terminal=34816 container_id=4f63870599d0 image=octarinesec/kube-recon) k8s.ns=<NA> k8s.pod=<NA> container=4f63870599d0
18:21:22.657590195: Warning Docker or kubernetes client executed in container (user=root user_loginuid=-1 k8s.ns=default k8s.pod=kuberecon container=4f63870599d0 parent=kube-recon cmdline=kubectl get pods image=octarinesec/kube-recon:latest) k8s.ns=default k8s.pod=kuberecon container=4f63870599d0
18:21:22.723707794: Notice Unexpected connection to K8s API Server from container (command=kubectl get pods k8s.ns=default k8s.pod=kuberecon container=4f63870599d0 image=octarinesec/kube-recon:latest connection=172.17.0.5:56972->10.96.0.1:443) k8s.ns=default k8s.pod=kuberecon container=4f63870599d0
Checking if shell is a container environment (Change thread namespace)
Description: amicontained is a tool to check whether the shell is a containerized environment. The rule detects an attempt to change a program/thread’s namespace.
$ cd /tmp; curl -L -o amicontained https://github.com/genuinetools/amicontained/releases/download/v0.4.7/amicontained-linux-amd64; chmod 555 amicontained; ./amicontained

Output:
Container Runtime: docker
Has Namespaces:
  pid: true
  user: false
AppArmor Profile: kernel
Capabilities:
  BOUNDING -> chown dac_override fowner fsetid kill setgid setuid setpcap net_bind_service net_raw sys_chroot mknod audit_write setfcap
Seccomp: disabled
Blocked Syscalls (19):
  MSGRCV SYSLOG SETSID VHANGUP PIVOT_ROOT ACCT SETTIMEOFDAY UMOUNT2 SWAPON SWAPOFF REBOOT SETHOSTNAME SETDOMAINNAME INIT_MODULE DELETE_MODULE LOOKUP_DCOOKIE KEXEC_LOAD OPEN_BY_HANDLE_AT FINIT_MODULE
Detection:
18:43:37.288344192: Notice Namespace change (setns) by unexpected program (user=root user_loginuid=-1 command=amicontained parent=bash k8s.ns=default k8s.pod=kuberecon container=c6112967b4f2 container_id=c6112967b4f2 image=octarinesec/kube-recon:latest) k8s.ns=default k8s.pod=kuberecon container=c6112967b4f2
Mon Nov 9 18:43:37 2020: Falco internal: syscall event drop. 9 system calls dropped in last second.
18:43:37.970973376: Critical Falco internal: syscall event drop. 9 system calls dropped in last second. (ebpf_enabled=0 n_drops=9 n_drops_buffer=0 n_drops_bug=0 n_drops_pf=9 n_evts=15232)
Next steps for securing your Kubernetes cluster
In this tutorial, we looked at the basics of Kubernetes security monitoring and how Falco allows us to use rules to achieve the detection of security issues. The default detection ruleset of Falco is enough to get yourself up and running, but you will most likely need to build on top of the default ruleset. We will explore building and tuning these rules in the upcoming posts on security. That’s a wrap folks! Do share your thoughts with us via Twitter.
Looking for help with cloud native security consulting & implementation? do check out our capabilities how we’re helping startups & enterprises as an cloud native consulting & services provider.
Stay updated with latest in AI and Cloud Native tech
We hate 😖 spam as much as you do! You're in a safe company.
Only delivering solid AI & cloud native content.


